DCR Monitor Explained: Should You Enable It? (2026 Guide)
Discover everything you need to know about Dynamic Contrast Ratio (DCR) on monitors, what it does, when to use it, and whether you should enable or disable it for optimal display performance.
📋 What You’ll Learn
What is DCR on a Monitor?
DCR (Dynamic Contrast Ratio) is an automatic display feature that adjusts your monitor’s backlight intensity in real-time based on the content being displayed. When darker scenes appear, DCR dims the backlight to produce deeper blacks, and when brighter content is shown, it increases backlight brightness to enhance highlights.
Unlike static contrast ratio (which is fixed), DCR can claim astronomical numbers like 10,000,000:1 or even higher. However, these numbers are often marketing-focused and don’t reflect real-world performance since the adjustment happens over time rather than simultaneously.
What Does DCR Stand For?
DCR stands for Dynamic Contrast Ratio, a feature found in many modern monitors that automatically adjusts your screen’s backlight brightness based on the content you’re viewing.
Unlike static contrast ratio, which measures the difference between the brightest white and darkest black your monitor can display simultaneously, DCR changes these values dynamically as you watch, game, or work.
Think of DCR as an automatic brightness assistant that constantly monitors what’s on your screen.
When you’re watching a dark movie scene, DCR dims the backlight to create deeper blacks. When bright content appears, it cranks up the brightness to make whites pop. This continuous adjustment creates the impression of superior contrast without requiring expensive display hardware.
The Simple Explanation
Imagine your monitor as a smart camera that constantly adjusts its settings based on lighting conditions.
When you walk into a dark room, the camera opens its aperture to let in more light. When you step into bright sunlight, it closes down to prevent overexposure.
DCR works similarly, it’s continuously analyzing what appears on your screen and adjusting backlight intensity accordingly.
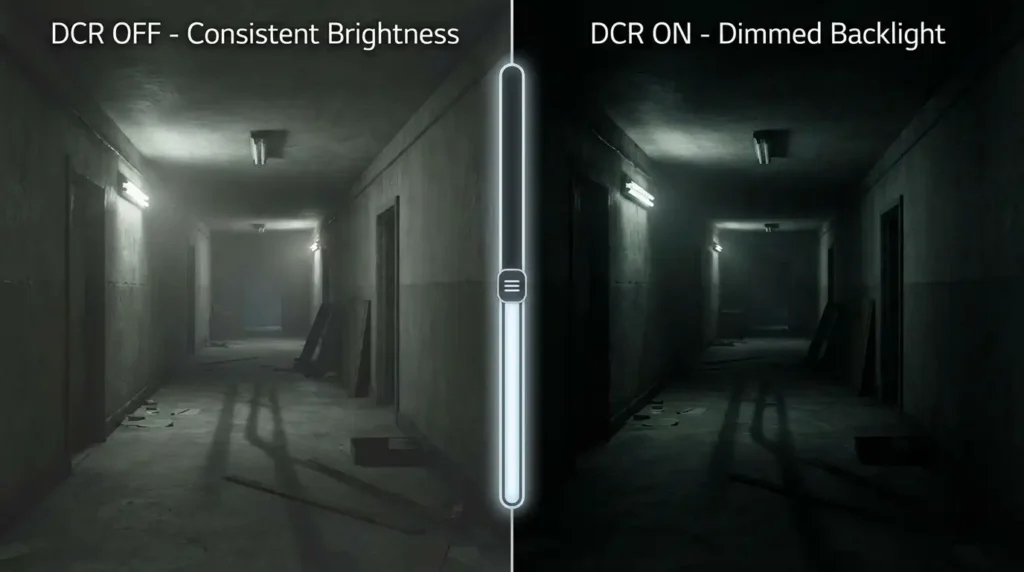
Here’s a real-world example: You’re playing a horror game with dark corridors and shadowy corners. DCR detects the predominantly dark imagery and reduces your monitor’s backlight intensity. This makes the blacks appear deeper and more atmospheric.
Suddenly, you walk into a brightly lit laboratory. DCR instantly recognizes the brightness change and ramps up the backlight, making the white walls and fluorescent lighting appear more vivid.
This happens automatically, without any input from you. The entire process occurs within milliseconds, though as you’ll learn later, these milliseconds can matter significantly for certain use cases.
The Technical Explanation
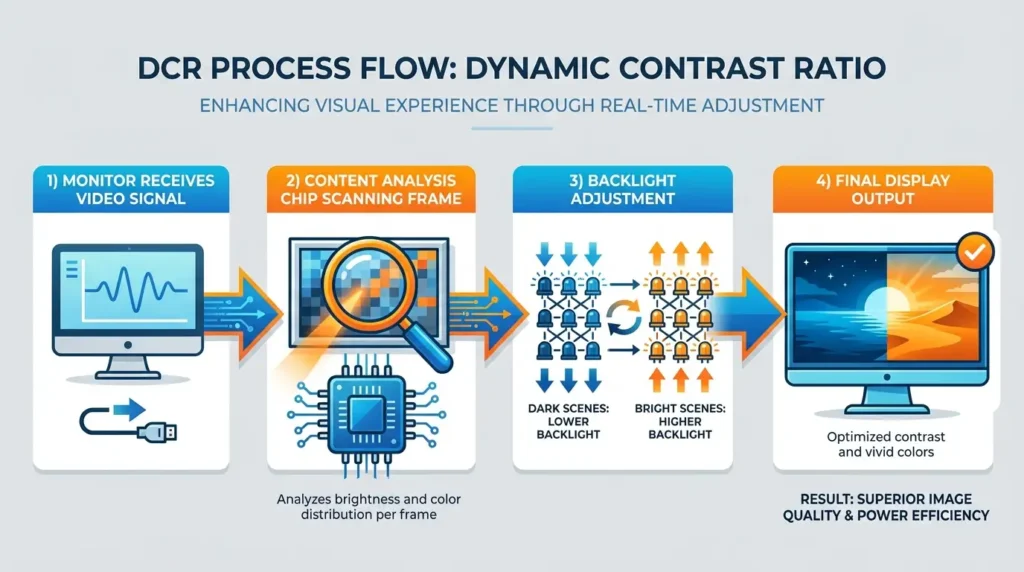
From a technical perspective, DCR operates through a three-stage process that happens continuously while your monitor is in use:
Stage 1: Content Analysis
Your monitor’s processing chip scans each frame of video or image data coming through the display cable. It calculates the average luminance (brightness) and analyzes the distribution of light and dark pixels across the entire screen.
Stage 2: Backlight Calculation
Based on this analysis, the monitor’s firmware determines the optimal backlight intensity. If the average scene brightness is below a certain threshold (typically 30-40% of maximum), the algorithm reduces backlight power. If brightness exceeds this threshold, it increases backlight intensity.
Stage 3: Dynamic Adjustment
The monitor rapidly adjusts the LED backlight array’s power output. Modern implementations can make these adjustments in 16-50 milliseconds, depending on the quality of the monitor’s DCR algorithm and hardware capabilities.
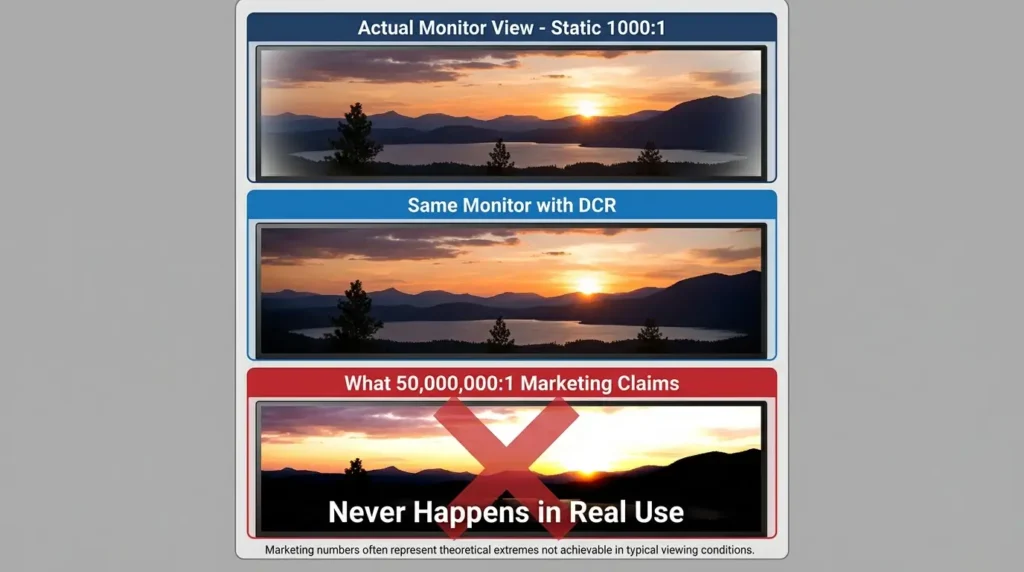
This entire process creates a moving target for contrast measurement. When measuring peak brightness with the backlight at maximum, you might see 400 cd/m². When measuring the darkest black with backlight at minimum, you might achieve 0.008 cd/m². Divide these numbers (measured separately), and you get an impressive 50,000:1 dynamic contrast ratio.
However, and this is crucial, these two extremes never exist on your screen simultaneously.
Your monitor cannot display its brightest white and darkest black at the same time when DCR is active, because the backlight affects the entire panel uniformly.
Why This Matters
Understanding what DCR actually does helps you make informed decisions about when to use it.
The technology isn’t inherently bad, but it serves specific purposes better than others.
A cinematic movie experience might benefit from DCR’s dramatic contrast shifts, while competitive gaming or color-critical photo editing can suffer from the same feature.
The most important takeaway? Those massive DCR numbers in specifications, 10,000,000:1, 50,000,000:1, even 100,000,000:1, don’t represent simultaneous contrast your eyes will actually see.
They’re theoretical maximums that sound impressive but tell you little about real-world picture quality.
Quick Answer: DCR automatically adjusts your monitor’s backlight based on screen content, dimming during dark scenes and brightening during light scenes to create the impression of enhanced contrast. While the feature can improve movie watching and casual use, it often introduces problems for gaming and professional work.
How Does DCR Actually Work?
The Technology Behind DCR
To truly understand whether DCR benefits your specific use case, you need to grasp the mechanics behind this technology.
While the concept sounds simple, adjust brightness automatically, the implementation involves several technical processes that directly impact your viewing experience.
Step-by-Step Process: What Happens Every Frame
Let’s break down exactly what occurs inside your monitor when DCR is enabled:
Step 1: Frame Buffer Analysis
As your graphics card sends image data to the monitor, the display’s scaler chip intercepts and analyzes this information before it reaches the LCD panel.
The chip examines the entire frame, calculating statistical data about pixel brightness distribution.
This analysis identifies whether the current frame contains predominantly dark content (like a night scene), bright content (like a snow-covered landscape), or mixed content (like a typical desktop workspace).
Step 2: Histogram Evaluation
The monitor builds a brightness histogram, essentially a graph showing how many pixels fall into each brightness category from pure black (0) to pure white (255). If the histogram shows most pixels clustered in the lower range (0-100), the monitor flags this frame as “dark content.” Conversely, if most pixels sit in the upper range (155-255), it’s marked as “bright content.”
Step 3: Backlight Power Adjustment
Based on this histogram analysis, the monitor’s firmware calculates an appropriate backlight intensity. Most DCR implementations use a proportional response curve rather than a binary on/off switch. For example:
- Frame histogram shows 80% dark pixels → Reduce backlight to 40% power
- Frame histogram shows 60% bright pixels → Increase backlight to 90% power
- Frame histogram shows mixed content → Maintain moderate backlight at 70% power
Step 4: Transition Smoothing
To prevent jarring brightness jumps when content changes rapidly, most monitors apply a transition algorithm. Instead of instantly jumping from 40% to 90% backlight, the monitor gradually increases intensity over 3-8 frames. This smoothing reduces flicker but introduces the latency that gamers find problematic.
Step 5: Display Output
Finally, the adjusted backlight combines with the LCD panel’s pixel states to produce the final image you see. Because the backlight affects all pixels uniformly (remember, this isn’t local dimming), the entire screen gets brighter or darker together.
This entire process repeats for every single frame, 60 times per second on a 60Hz monitor, 144 times per second on a 144Hz gaming display, and so on.
Why Manufacturers Love DCR
From a manufacturer’s perspective, DCR offers several compelling advantages that explain why it appears on so many monitors:
Impressive Specification Sheets
A monitor with a 1000:1 static contrast ratio and DCR can claim specifications like “10,000,000:1 dynamic contrast.” These massive numbers catch consumers’ eyes during shopping comparisons, even though they don’t represent real-world viewing conditions. Marketing teams love DCR because it transforms modest-performing panels into specification champions.
Low Implementation Costs
Unlike hardware-based contrast enhancement technologies such as full-array local dimming (FALD), DCR requires minimal additional hardware. The necessary processing already exists in the monitor’s scaler chip. Implementing DCR primarily involves firmware development rather than expensive LED arrays or complex hardware modifications. This means manufacturers can add an attractive feature with negligible cost increase.
Power Efficiency Benefits
DCR provides legitimate power savings by reducing backlight intensity during dark content. For office monitors displaying predominantly white documents and web pages, this might seem counterproductive. However, for multimedia displays showing varied content, power consumption can drop by 5-15% with DCR enabled, a genuine environmental and cost benefit that helps manufacturers meet energy efficiency certifications.
Competitive Parity
Since most competitors offer DCR, excluding it might make a monitor appear inferior in direct specification comparisons. Even if the technology doesn’t significantly enhance image quality, its absence could hurt sales when consumers compare specification sheets side-by-side.
The Catch: What They Don’t Tell You
While those millions-to-one contrast ratios look extraordinary on paper, several important limitations rarely appear in marketing materials:
Sequential, Not Simultaneous Measurement
The astronomical DCR numbers come from measuring the brightest possible white (backlight at 100%, LCD showing white) and darkest possible black (backlight at minimum, LCD showing black) separately. Your monitor never displays both simultaneously when DCR is active. The meaningful number, static contrast ratio, measures both at the same time and tells you far more about actual image quality.
Uniform Backlight Limitation
Because standard DCR adjusts the entire backlight uniformly, it cannot enhance contrast within a single frame. If you’re viewing a scene with both a bright sky and dark shadows, DCR must compromise. It either dims the backlight (making the sky less bright to improve shadows) or brightens it (making shadows less deep to properly display the sky). It cannot do both simultaneously, unlike true HDR with local dimming.
Processing Latency Introduction
The analysis and adjustment process takes time, typically 2-8 milliseconds depending on the monitor’s processing speed and transition smoothing algorithms. For casual use, this latency is imperceptible. For competitive gaming where every millisecond matters, this delay can negatively impact performance.
Content-Dependent Performance
DCR works best with content that remains consistently bright or consistently dark for extended periods. It struggles with rapidly changing scenes, mixed-brightness content, or applications with varying brightness across different windows. These scenarios cause constant backlight fluctuations that become distracting rather than beneficial.
Real-World Example: DCR in Action
Consider watching a movie scene that transitions from a dark cave interior to a bright outdoor landscape.
Here’s what happens:
Without DCR: Your monitor maintains constant backlight. The cave looks appropriately dark based on your manual brightness setting, and the outdoor scene looks bright. Contrast within each scene matches your monitor’s native static contrast ratio (typically 1000:1 for IPS, 3000:1 for VA).
With DCR Enabled: During the cave scene, your monitor dims the backlight significantly, making blacks appear deeper and more atmospheric, the scene looks fantastic. When the character steps outside, your monitor detects the brightness change and begins ramping up the backlight. Over the next 200-300 milliseconds, the screen gradually brightens. This transition might appear natural during a smooth cut, or it might be noticeably distracting during a rapid scene change.
The quality of this experience depends entirely on your DCR implementation’s sophistication, the content’s characteristics, and your personal sensitivity to brightness fluctuations.
Key Insight: DCR is fundamentally a compromise technology, it improves some aspects of image quality in specific scenarios while introducing trade-offs in others. Understanding these trade-offs helps you decide when enabling DCR makes sense for your use case.
DCR vs. Static Contrast Ratio
What is Static Contrast Ratio?
Before comparing DCR to static contrast, you need to understand what static contrast actually measures. Static contrast ratio represents your monitor’s ability to display bright and dark elements simultaneously in the same frame.
It’s measured by showing a pure white screen, recording the luminance (measured in candelas per square meter, or cd/m²), then displaying a pure black screen and measuring that luminance, all while keeping backlight and monitor settings constant.
For example, if your monitor produces 300 cd/m² of brightness when displaying white and 0.3 cd/m² when displaying black, it has a static contrast ratio of 1000:1 (300 ÷ 0.3 = 1000). This number remains constant regardless of what you’re viewing, it’s an inherent property of your monitor’s LCD panel and backlight system.
Why static contrast matters: This measurement directly correlates with your monitor’s ability to display detail in both bright and dark areas of the same image. A higher static contrast ratio means you’ll see more nuance in shadow details while simultaneously viewing bright highlights, without one washing out the other.
What is Dynamic Contrast Ratio (DCR)?
Dynamic contrast ratio, by contrast (pun intended), measures the brightest white your monitor can produce at maximum backlight against the darkest black achievable at minimum backlight, two measurements taken at completely different times with completely different backlight settings.
Using the same monitor from our previous example, if you increase backlight to 100%, you might achieve 400 cd/m² brightness. If you decrease backlight to its minimum (say, 10%), you might achieve 0.04 cd/m² black level. Divide these: 400 ÷ 0.04 = 10,000:1 dynamic contrast ratio.
The same monitor advertises both 1000:1 static and 10,000:1 dynamic contrast, yet the latter never represents what you’ll actually see during real-world use.
Some manufacturers take this even further, using content-reactive measurements where they analyze the darkest and brightest possible scenarios their DCR algorithm might create, resulting in those impressive 50,000,000:1 specifications.
The Critical Difference: Why Static Matters More
The fundamental distinction between these measurements reveals why static contrast ratio provides far more useful information for monitor buyers:
Static contrast represents real capability.
When you view a photograph containing both a bright sky and dark forest shadows, your monitor’s static contrast determines how much detail you’ll see in both simultaneously. A monitor with 3000:1 static contrast (typical for good VA panels) will show significantly more shadow detail while maintaining bright highlights compared to a 1000:1 display (typical for IPS panels), regardless of any DCR specifications.
DCR represents theoretical extremes.
That 50,000,000:1 DCR specification tells you nothing about contrast within actual content. When displaying mixed-brightness scenes, which constitute most real-world content, DCR cannot enhance within-scene contrast. It can only adjust global brightness between different scenes.
Static contrast affects every moment.
Your monitor’s static contrast ratio influences image quality continuously, in every frame, regardless of content type. It’s the foundation of your viewing experience.
DCR affects transitions between scenes.
Dynamic contrast only matters when content brightness changes significantly. It has zero effect on static images, documents, or any content where brightness remains relatively constant.
Comparison in Real-World Scenarios
Let’s examine how these different contrast measurements manifest in actual use:
Scenario 1: Viewing a Landscape Photo
Your photo contains a bright sky (250 cd/m² target), medium-tone landscape (100 cd/m²), and dark forest shadows (10 cd/m²).
- Monitor A: 1000:1 static, 10,000,000:1 DCR
Static contrast determines you’ll see a 10:1 ratio between the brightest and darkest elements within this single image. The DCR specification is completely irrelevant, nothing for it to adjust. - Monitor B: 3000:1 static, no DCR
You’ll see a 30:1 ratio between the brightest and darkest elements, revealing far more shadow detail and better overall image depth despite the absence of DCR.
Winner: Monitor B, despite lower (technically nonexistent) dynamic contrast specifications.
Scenario 2: Watching a Movie with Varying Scene Brightness
The movie transitions from a bright beach scene to a dark cave interior.
- Monitor A (1000:1 static, 10,000,000:1 DCR):
During the beach scene, DCR maximizes backlight. You see bright whites but limited shadow detail (1000:1 static limitation). During the cave scene, DCR minimizes backlight. Blacks look deeper, but bright elements like torches have limited luminance (still limited by 1000:1 static within the scene). Transitions between scenes involve visible brightness adjustments. - Monitor B (3000:1 static, no DCR):
Both scenes display with consistent backlight. The beach scene shows both bright whites and excellent shadow detail (3000:1 capability). The cave scene displays deep blacks and brighter torch flames (3000:1 capability). Transitions are seamless with no backlight adjustments.
Winner: Monitor B provides superior within-scene contrast and smoother viewing experience.
Scenario 3: Competitive Gaming
You’re playing a first-person shooter with varying environment brightness.
- Monitor A (1000:1 static, DCR enabled):
As you move from outdoor to indoor environments, DCR adjusts backlight, adding 2-5ms input lag and causing brightness fluctuations that temporarily obscure visibility during transitions. Within each environment, contrast is limited to 1000:1. - Monitor B (3000:1 static, DCR disabled):
Consistent brightness and contrast across all environments. Superior shadow detail helps spot enemies in dark corners. Zero additional input lag. Predictable, consistent visibility.
Winner: Monitor B dramatically outperforms for competitive gaming.
The Numbers: A Comparative Look
Here’s how static and dynamic contrast specifications typically compare across different panel technologies:
| Panel Type | Typical Static Contrast | Typical DCR (Marketing) | Real-World Performance |
| IPS | 1000:1 | 10,000,000:1 | Excellent colors, limited contrast |
| VA | 3000:1 – 6000:1 | 50,000,000:1 | Superior contrast, good colors |
| TN | 600:1 – 1000:1 | 10,000,000:1 | Fast response, poor contrast |
| OLED | ∞:1 (infinite) | N/A | Perfect blacks, excellent contrast |
Notice how DCR specifications vary wildly yet provide minimal useful information, while static contrast clearly differentiates panel quality.
Expert Perspectives on Contrast Measurements
Display testing professionals consistently emphasize static contrast’s importance over DCR specifications. Hardware reviewers like those at RTings, TFT Central, and DisplayMate focus almost exclusively on static contrast measurements in their testing methodologies, often not even mentioning DCR in reviews.
When DisplayMate tested monitors for contrast performance, they found that a VA panel with 3000:1 static contrast and no DCR consistently outperformed IPS panels with 1000:1 static contrast and aggressive DCR implementations in blind viewing tests. Observers preferred the consistent, higher-quality contrast of the VA panel over the artificially enhanced but ultimately limited DCR performance of IPS displays.
Expert Consensus: “A monitor with 1000:1 static contrast and 50,000,000:1 DCR will often provide inferior real-world image quality compared to a display with 3000:1 static contrast and no DCR. When shopping for monitors, prioritize static contrast specifications and ignore DCR marketing numbers.” – DisplayMate Analysis
What to Look for When Shopping
When evaluating monitor specifications, apply this hierarchy of importance for contrast-related features:
- Static Contrast Ratio – The single most important contrast specification
- Minimum 1000:1 (acceptable for IPS)
- 3000:1+ (ideal, typical of good VA panels)
- Higher is always better
- Panel Technology – Determines inherent contrast capabilities
- VA panels: Best static contrast (3000:1 to 6000:1)
- IPS panels: Lower contrast (1000:1) but better colors
- TN panels: Poor contrast, fast response
- HDR Implementation – If available, far superior to DCR
- HDR400: Entry-level, moderate improvement
- HDR600: Substantial improvement
- HDR1000: Excellent image quality
- Local Dimming Zones – Hardware-based contrast enhancement
- FALD (Full Array Local Dimming): Best
- Edge-lit dimming: Moderate improvement
- No local dimming: Acceptable with good static contrast
- DCR Specifications – Nearly irrelevant
- Can be completely ignored during purchase decisions
- Presence of DCR isn’t necessarily bad (just don’t buy based on it)
- Absence of DCR isn’t a negative
Common Misconceptions Debunked
Misconception 1: “Higher DCR means better picture quality”
Reality: DCR specifications have virtually no correlation with perceived image quality in real-world use.
Misconception 2: “DCR is the same as HDR”
Reality: DCR is basic backlight adjustment. HDR is comprehensive technology involving color space, brightness standards, and often hardware-based local dimming.
Misconception 3: “My monitor claims 10,000,000:1 contrast, so it must be amazing”
Reality: That number represents an impossible-to-achieve theoretical maximum. Your monitor’s actual contrast during normal use equals its static contrast ratio.
Misconception 4: “DCR improves contrast within images”
Reality: DCR only adjusts global brightness between different content. It cannot enhance contrast within a single frame.
DCR vs. HDR: What’s Actually Better?
Understanding the Fundamental Difference
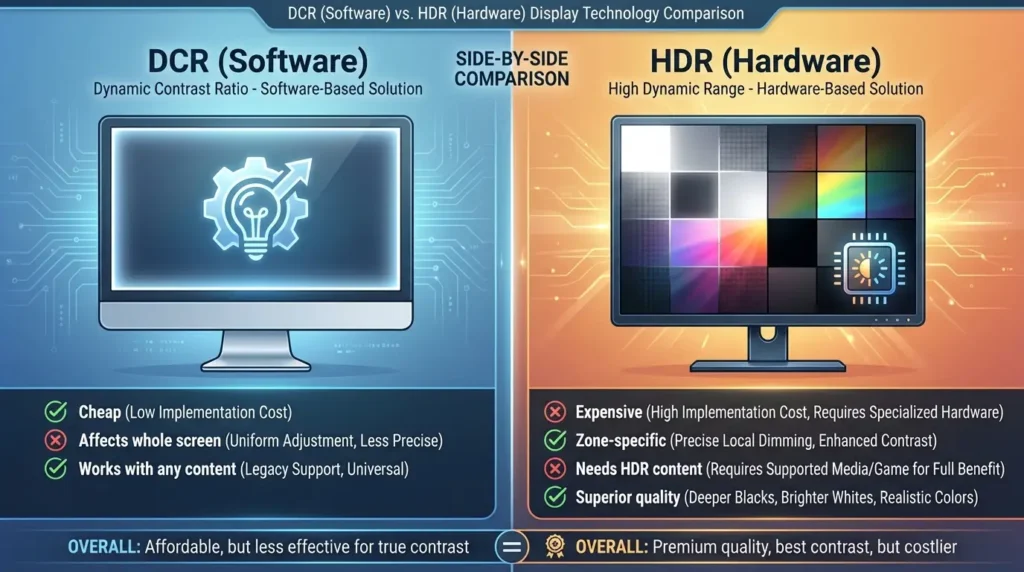
Before comparing DCR and HDR, you need to understand that these technologies operate on completely different levels. DCR is a basic firmware feature that costs manufacturers almost nothing to implement, it’s essentially automated brightness adjustment.
HDR (High Dynamic Range) is a comprehensive ecosystem involving content creation standards, display hardware capabilities, and processing requirements that work together to deliver genuinely enhanced image quality.
Think of it this way: DCR is like using an Instagram filter on a standard photo, while HDR is like capturing an entirely different photograph with a professional camera that can record much more light information to begin with. The end results are incomparable.
What is HDR? (And Why It’s Revolutionary)
HDR represents a fundamental change in how visual content is captured, encoded, delivered, and displayed. Unlike DCR, which simply adjusts your existing monitor’s backlight after the fact, HDR encompasses an entire production and display pipeline designed to preserve and display much more visual information than standard dynamic range (SDR) content.
HDR content differs in three critical ways:
1. Expanded Brightness Range
SDR content maxes out at 100 nits (cd/m²) for reference white in production standards, even though your monitor might display it brighter. HDR content can contain brightness information from 0.0005 nits (very dark) to 1,000 nits, 4,000 nits, or even 10,000 nits (exceptionally bright) depending on the mastering process. This expanded range preserves details in highlights that SDR completely clips and loses.
2. Wider Color Gamut
SDR uses the Rec. 709 color space, covering about 35% of visible colors. HDR typically uses DCI-P3 (about 50% of visible colors) or Rec. 2020 (about 75% of visible colors). This means HDR content can display more vibrant, saturated colors that simply don’t exist in SDR.
3. Perceptual Encoding (PQ Curve)
HDR uses the PQ (Perceptual Quantizer) transfer function, which maps brightness values to match human vision’s logarithmic response to light. This preserves more detail in both shadows and highlights compared to SDR’s gamma curve.
Your HDR-capable monitor must meet specific hardware requirements to properly display this content, requirements that go far beyond what DCR provides.
HDR Hardware Requirements vs. DCR
Let’s compare what each technology actually requires from your monitor:
DCR Requirements:
- Standard LCD panel (any type)
- Basic backlight control (already exists)
- Scaler chip with analysis firmware (minimal cost)
- No special certifications needed
- Total added cost: $0-5 per monitor
HDR Requirements (HDR400 minimum):
- Panel capable of at least 400 nits peak brightness
- 8-bit color depth minimum (10-bit preferred)
- Wide color gamut support (90%+ DCI-P3)
- HDR metadata processing capability
- HDMI 2.0 or DisplayPort 1.4 minimum
- VESA DisplayHDR certification testing
- Total added cost: $50-150 for entry HDR400
Premium HDR Requirements (HDR1000):
- Panel capable of 1000+ nits peak brightness
- Full-array local dimming (FALD) with numerous zones
- 10-bit or 12-bit color processing
- 95%+ DCI-P3 color coverage
- Advanced HDR tone mapping
- Total added cost: $300-800 for HDR1000
The cost difference reflects genuine hardware improvements that DCR simply cannot provide through software alone.
Key Differences in Capability
Understanding what each technology can and cannot do clarifies why they’re not comparable:
DCR Capabilities:
- ✅ Adjusts global screen brightness based on content
- ✅ Works with any content (SDR or HDR)
- ✅ Can reduce power consumption slightly
- ✅ Zero content creator involvement needed
- ❌ Cannot display brightness beyond panel’s native capability
- ❌ Cannot enhance color gamut
- ❌ Cannot improve within-scene contrast
- ❌ Affects entire screen uniformly
- ❌ No standardization or certification
HDR Capabilities:
- ✅ Displays genuine extended brightness range (if hardware supports it)
- ✅ Shows wider color gamut with more vivid colors
- ✅ Preserves highlight detail that SDR clips
- ✅ Reveals shadow detail that SDR crushes
- ✅ Standardized experience across certified displays
- ✅ Zone-specific contrast control (with local dimming)
- ✅ Content creator intent preserved
- ❌ Requires HDR content to function
- ❌ Significantly more expensive hardware
- ❌ Can introduce complexity (tone mapping variations)
Real-World Comparison: The Same Scene
Let’s examine how DCR and HDR handle identical content to illustrate the practical differences:
Scene: A sunset photograph showing a bright sun, orange sky, dark silhouetted trees, and shadow details in the foreground.
Standard Monitor (No DCR, No HDR):
- Sun appears bright but washed out (clipping)
- Orange sky displays within monitor’s color gamut
- Trees appear dark but with visible detail
- Shadow details somewhat preserved based on static contrast
- Consistent, predictable appearance
Same Monitor with DCR Enabled:
- Monitor analyzes overall scene brightness
- Adjusts backlight to moderate level (mixed content)
- Sun still appears clipped (DCR can’t add brightness beyond panel maximum)
- Orange sky unchanged (DCR doesn’t affect color)
- Trees and shadows slightly adjusted by global backlight change
- Minimal practical difference from DCR-off viewing
HDR Monitor (HDR400) Displaying HDR Content:
- Sun displays at 400+ nits, appearing genuinely brighter with visible corona detail
- Orange sky shows expanded DCI-P3 colors, more vibrant and saturated
- Trees remain dark but with better-preserved shadow detail
- Foreground shadows reveal significantly more information
- Dramatic improvement in depth and realism
Premium HDR Monitor (HDR1000 with FALD) Displaying HDR Content:
- Sun blazes at 1000+ nits with full corona detail preserved
- Sky shows even more vibrant colors approaching real-world saturation
- Local dimming keeps trees deeply black while sun remains brilliant
- Shadow details fully preserved without raising black levels
- Transformative viewing experience approaching real-world vision
The HDR implementations, especially premium HDR with local dimming, deliver results that DCR cannot approach because they’re working with fundamentally different source content and using dramatically superior hardware.
HDR Certification Levels Explained
If you’re considering HDR, understanding certification levels helps you set appropriate expectations:
VESA DisplayHDR 400:
- 400 nits peak brightness (modest improvement over SDR)
- 95% Rec. 709 / 90% DCI-P3 color
- Global dimming only (no local dimming required)
- Entry-level HDR experience
- Real-world impact: Noticeable but not dramatic improvement over good SDR displays
- Cost: $200-400 monitors
VESA DisplayHDR 600:
- 600 nits peak brightness (significant improvement)
- 99% Rec. 709 / 90% DCI-P3 color
- Local dimming required (minimum specifications)
- Mid-tier HDR experience
- Real-world impact: Substantial improvement, especially in bright scenes
- Cost: $400-700 monitors
VESA DisplayHDR 1000:
- 1000+ nits peak brightness (exceptional)
- 99% Rec. 709 / 95% DCI-P3 color
- FALD with numerous zones required
- Premium HDR experience
- Real-world impact: Transformative image quality approaching OLED
- Cost: $800-2000+ monitors
VESA DisplayHDR 1400 and TrueBlack:
- 1400+ nits or perfect blacks (OLED)
- 99% DCI-P3 or wider
- Highest-tier consumer HDR
- Real-world impact: Reference-quality image reproduction
- Cost: $1500-3000+ monitors
Compare this to DCR, which has no certification standards, no guaranteed performance levels, and no meaningful correlation between specifications and real-world quality.
Can You Use DCR and HDR Together?
Most monitors automatically disable DCR when displaying HDR content, and this is actually beneficial. HDR content already contains detailed brightness metadata that tells your monitor exactly how bright or dark each element should appear. HDR’s tone mapping algorithms provide sophisticated brightness control that far exceeds DCR’s capabilities.
Enabling DCR on top of HDR would interfere with the content creator’s intended presentation by adding an additional layer of automated adjustment. It’s similar to applying two Instagram filters simultaneously, you’re more likely to degrade the image than improve it.
Some monitors offer DCR functionality even when displaying HDR content, but this typically only affects SDR elements like the operating system UI when HDR content isn’t actively playing. During actual HDR playback, the HDR pipeline takes complete control.
Which Should You Choose?
Your decision between prioritizing DCR or HDR depends entirely on your budget and use case:
Choose a Monitor with DCR (and no HDR) if:
- Your budget is under $200
- You primarily view SDR content (most web browsing, office work, older games)
- You’re not bothered by brightness fluctuations
- You don’t need color accuracy for professional work
- You watch movies casually and want a free enhancement
Choose a Monitor with HDR400 if:
- Your budget is $200-400
- You watch some HDR content (streaming services, newer games)
- You want noticeably better colors and brightness
- You understand HDR400 is entry-level (don’t expect miracles)
- You’re willing to disable DCR for HDR content
Choose a Monitor with HDR600+ if:
- Your budget is $400+
- You regularly consume HDR content
- You want genuinely impressive image quality improvements
- You value both gaming and multimedia viewing
- You’re willing to invest in superior hardware
Choose a Monitor with HDR1000/FALD if:
- Your budget is $800+
- You’re a serious gamer or content creator
- Image quality is a top priority
- You want the best non-OLED experience
- You understand and value the technology
Choose an OLED Monitor if:
- Your budget is $1000+
- You want the absolute best contrast and colors
- You understand burn-in risks (for professional use)
- You primarily game or consume media (not static content)
- Perfect blacks matter more than peak brightness
The Bottom Line: They’re Not Comparable
Comparing DCR to HDR is like comparing a basic FM radio to a high-fidelity streaming system. Both deliver audio, but the quality, capabilities, and user experience are entirely different.
DCR is a budget-friendly feature that provides minimal enhancement in specific scenarios. HDR is a comprehensive technology that fundamentally transforms image quality when properly implemented with appropriate content.
If you’re choosing between a monitor with “amazing DCR specs” and one with genuine HDR certification, even entry-level HDR400, the HDR monitor will provide superior image quality in virtually every scenario, assuming you have access to HDR content.
Winner: HDR (in every meaningful category)
DCR serves a purpose as a free bonus feature on budget monitors, but it’s not a substitute for genuine HDR technology. If your budget allows, always prioritize HDR over DCR when making a purchase decision.
Should You Turn DCR ON or OFF?
The Ultimate Question Answered
After understanding what DCR does and how it compares to other technologies, you’re ready for the most practical question:
should you actually use it? The answer isn’t universal, it depends entirely on what you’re doing with your monitor.
Let’s break down when DCR helps, when it hurts, and when it doesn’t matter.
When to ENABLE DCR
DCR can genuinely improve your experience in specific scenarios where its limitations don’t matter and its benefits shine through:
1. Movie and TV Show Watching
Why DCR helps here: Movies and shows typically consist of complete scenes that maintain relatively consistent brightness for extended periods. When you’re watching a dark interior scene for 30 seconds, DCR can reduce backlight throughout that entire segment, creating deeper blacks and more atmospheric viewing. When the scene transitions to bright exteriors, DCR adjusts accordingly.
Best practices:
- Enable DCR before starting your movie
- Use “Cinema” or “Movie” preset modes (often include optimized DCR)
- Dim room lighting to maximize DCR’s black level benefits
- Works especially well with: horror films, noir cinematography, space scenes
Content types that benefit most:
- Cinematic movies with deliberate pacing
- TV dramas with scene-based structure
- Nature documentaries with consistent environment brightness
- Animated films (typically have clear bright/dark scene separation)
2. Single-Player Story-Driven Games
Why DCR helps here: Story-focused games share characteristics with movies, scene-based structure, atmospheric priorities over competitive advantage, and tolerance for slight input lag.
Games like The Witcher 3, Red Dead Redemption 2, or atmospheric horror titles can feel more immersive with DCR’s enhanced contrast during dark dungeons or nighttime exploration.
Best practices:
- Test your specific game (some handle DCR better than others)
- Enable only if you don’t notice distracting brightness shifts
- Particularly good for: horror games, RPGs, adventure games
- Consider disabling during action-heavy sequences if you notice lag
Games that work well with DCR:
- The Witcher 3: Wild Hunt
- Red Dead Redemption 2
- Resident Evil series
- Control
- Cyberpunk 2077 (story mode)
- Assassin’s Creed series
3. General Web Browsing and Office Work
Why DCR might help: If you’re reading articles, working with documents, or browsing websites with predominantly white backgrounds, DCR can slightly reduce backlight intensity, potentially reducing eye strain and saving minor amounts of power. The brightness fluctuations are less noticeable when you’re focused on text content.
Best practices:
- Try it for a few days to see if you notice benefits
- Disable immediately if brightness changes become distracting
- Consider manual brightness adjustment as an alternative
- May help during extended reading sessions
When to avoid even for office work:
- Multi-window workflows (different window brightness causes fluctuations)
- Graphic design or color-sensitive work
- Video conferencing (brightness changes are distracting to you and viewers)
- Spreadsheet work with lots of scrolling (constant brightness adjustments)
4. Casual Photo Viewing
Why DCR helps: When browsing photo galleries or viewing photography as a leisure activity (not editing), DCR can make dark photos appear more dramatic and bright photos more vivid through backlight adjustments.
Best practices:
- Enable for personal photo browsing
- Creates more dynamic viewing experience for vacation photos
- Works well with photo slideshows
- Never use for photo editing (more on this later)
5. Power Saving Priority
Why DCR helps: If you’re using a laptop or concerned about electricity consumption, DCR’s backlight reduction during dark content can save 5-15% power in typical mixed-use scenarios.
Best practices:
- Enable DCR as part of power-saving profile
- Combine with other power-saving features
- Most beneficial on larger displays (24″+ monitors use more backlight power)
- Consider the trade-off: power savings vs. image quality consistency
When to DISABLE DCR
Many scenarios benefit dramatically from turning DCR off. In these situations, DCR’s limitations outweigh any potential benefits:
1. Competitive Gaming (Critical – Always Disable)
Why DCR hurts competitive gaming:
Input Lag Addition
DCR’s content analysis and backlight adjustment process adds 2-8 milliseconds of processing delay. While this seems minor, competitive gamers operate in an environment where 240Hz monitors (4.16ms frame time) and sub-1ms response times matter. Adding another 5ms through DCR can mean the difference between winning and losing crucial encounters.
Visibility Inconsistency
In competitive multiplayer games, enemy visibility is paramount. DCR can darken areas where enemies hide, making them harder to spot during crucial moments. When you’re playing Counter-Strike, Valorant, or Apex Legends, you need consistent visibility in all lighting conditions, something DCR undermines by constantly adjusting brightness.
Adaptation Delays
Your eyes adapt to current brightness levels. When DCR suddenly shifts brightness as you move between environments (outdoor to indoor, bright hallway to dark room), your visual system needs 200-500 milliseconds to readjust. During this brief period, you’re essentially “blind” to subtle movements or enemies.
Testing Evidence
Professional esports players almost universally disable DCR. Testing by competitive gaming analysts shows measurable reaction time decreases of 8-15 milliseconds when DCR is enabled compared to disabled, directly attributable to the visibility inconsistency and adaptation delays.
Games where disabling DCR is critical:
- Counter-Strike 2 / CS:GO
- Valorant
- Rainbow Six Siege
- Apex Legends
- Call of Duty (multiplayer)
- Fortnite
- League of Legends
- Dota 2
- Overwatch 2
- Any competitive FPS or MOBA
2. Professional Photo and Video Editing (Critical – Always Disable)
Why DCR destroys professional workflows:
Color Accuracy Compromised
DCR changes backlight intensity, which directly affects color temperature and brightness calibration. When you’re color grading video or editing photos, you need to see exactly what your content will look like on properly calibrated displays. DCR makes this impossible by constantly changing the underlying brightness that affects color perception.
Inconsistent Reference
Professional editing requires a consistent reference point. You might spend 20 minutes perfecting the exposure of a photo, only to have DCR shift brightness when you open a different image, making your previous adjustments look wrong. This creates an unstable editing environment where you can’t trust what you’re seeing.
Calibration Interference
If you’ve calibrated your monitor using a colorimeter (like X-Rite i1Display or Datacolor SpyderX), DCR completely undermines that calibration by changing brightness independently of your calibrated profile.
Professional Standards
Industry-standard workflows for photography (Adobe RGB), video production (Rec. 709), and print work (all) require consistent, calibrated display output. DCR violates these standards.
Creative work requiring DCR disabled:
- Photography editing (Lightroom, Photoshop)
- Video color grading (DaVinci Resolve, Premiere Pro)
- Graphic design (Illustrator, InDesign)
- 3D rendering review (Blender, Maya)
- Print preparation
- Any color-critical professional work
3. Fast-Paced Action Content
Why DCR struggles with rapid scene changes: Action movies, sports, racing games, and other content with rapid brightness transitions expose DCR’s fundamental weakness, it cannot adjust quickly enough to keep pace with fast scene changes, resulting in visible lag where brightness appears “behind” the current content.
Content types to disable DCR for:
- Sports broadcasts (constant bright field to dark bench transitions)
- Action movies (explosions, quick cuts between environments)
- Racing games (rapid environment changes)
- Fighting games (stage transitions with lighting changes)
- Music videos (rapid cuts and effects)
4. Multi-Window Workflows
Why DCR creates problems: If you work with multiple windows simultaneously, for example, a dark code editor alongside a bright web browser, or a dark photo editing application next to bright reference images, DCR will constantly fluctuate as you switch focus between windows. This creates a disruptive, unpredictable viewing experience.
Scenarios requiring DCR disabled:
- Software development (dark IDE + bright documentation)
- Research work (multiple documents/websites open)
- Comparative tasks (comparing different content types)
- Multitasking environments
- Any workflow involving frequent window switching
5. Content Creation and Streaming
Why DCR causes issues: If you’re creating YouTube videos, streaming on Twitch, or producing any content where others will view your screen, DCR can create inconsistent brightness that looks unprofessional. Your viewers will notice brightness fluctuations that you might not see in the moment.
Creation scenarios requiring DCR disabled:
- Streaming gameplay
- Recording video tutorials
- Screen sharing presentations
- Video production
- Live demonstrations
When DCR Doesn’t Matter (Personal Preference)
Some activities aren’t significantly affected by DCR either way. In these scenarios, try both settings and choose based on personal preference:
Casual single-player gaming – Story-focused games without competitive elements
Music listening – When your monitor displays visualizations
Email and messaging – Simple communication tasks
Casual web browsing – Without color-critical viewing
Document reading – PDFs, ebooks (unless professionally reviewing layouts)
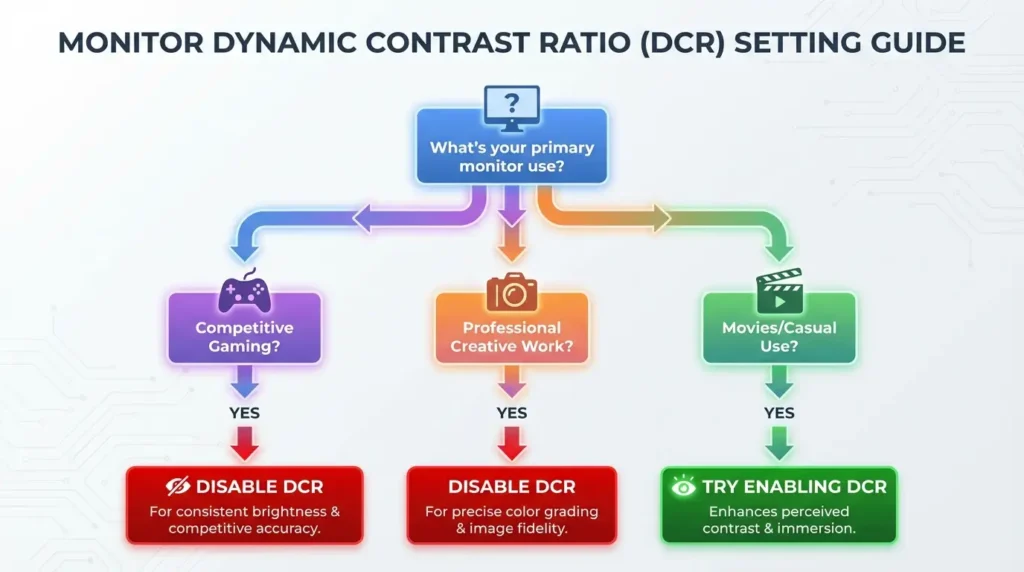
Decision-Making Flowchart
Here’s a simple decision tree to determine your ideal DCR setting:
Pro Tips for DCR Usage
Tip 1: Test Both Settings for One Week Each
Don’t make a snap decision. Enable DCR for a full week of normal use, then disable it for another week. Many people don’t notice DCR’s subtle effects until they’ve experienced both settings extensively.
Tip 2: Create Use-Case Profiles
Many monitors allow saving custom profiles. Create one with DCR enabled (“Movie Mode”) and another with DCR disabled (“Gaming Mode”), then switch between them based on your current activity.
Tip 3: Consider Your Room Lighting
DCR’s benefits are most noticeable in dim viewing environments where its black level improvements shine. In bright rooms, the benefits diminish significantly. If you primarily use your monitor in a well-lit office, DCR’s advantages largely disappear.
Tip 4: Check Your Monitor’s DCR Implementation
Not all DCR implementations are equal. Some monitors have sophisticated algorithms with gradual transitions, while others use aggressive, distracting adjustments. Your specific monitor’s DCR quality matters significantly, read reviews to see if reviewers mention DCR behavior.
Tip 5: Disable First, Enable Later
If you’re unsure, start with DCR disabled. This gives you the most consistent, predictable experience. You can always enable it later if you feel you’re missing atmospheric enhancement, but you might find you prefer the stability of DCR-off viewing.
Pro Recommendation: For 90% of users, the optimal setting is DCR OFF. The consistency, predictability, and lack of input lag outweigh the modest atmospheric enhancements DCR provides. Enable it only after testing and confirming it benefits your specific use case.
The key takeaway: DCR is a specialized feature that genuinely helps in specific scenarios but causes problems in others. Rather than leaving it at default settings, actively decide based on your primary monitor use. When in doubt, turn it off, you’ll enjoy a more consistent, professional, and competitive viewing experience.
DCR for Gaming: Enable or Disable?
The Short Answer for Gamers
For 90% of gamers: Keep DCR OFF. This recommendation comes from testing, pro player preferences, and the fundamental incompatibility between DCR’s operation and gaming’s requirements for consistent, low-latency visual response.
However, the complete answer is more nuanced. Your ideal DCR setting depends on your gaming style, the specific games you play, and whether you prioritize competitive performance or atmospheric immersion.
Why Most Gamers Should Disable DCR
Before exploring the exceptions, let’s understand why the gaming community generally avoids DCR:
Input Lag: The Hidden Performance Tax
The Problem:
DCR adds processing latency to every frame. Your monitor must analyze frame content, calculate appropriate backlight adjustment, and physically change LED backlight intensity, all before displaying the image. This entire process typically adds 2-8 milliseconds of delay, varying based on your monitor’s processing capability.
Why It Matters:
Modern gaming monitors emphasize speed. A 144Hz monitor delivers frames every 6.94ms, while 240Hz delivers every 4.16ms. Premium monitors achieve sub-1ms response times. In this context, adding 5ms through DCR represents a significant portion of your total system latency.
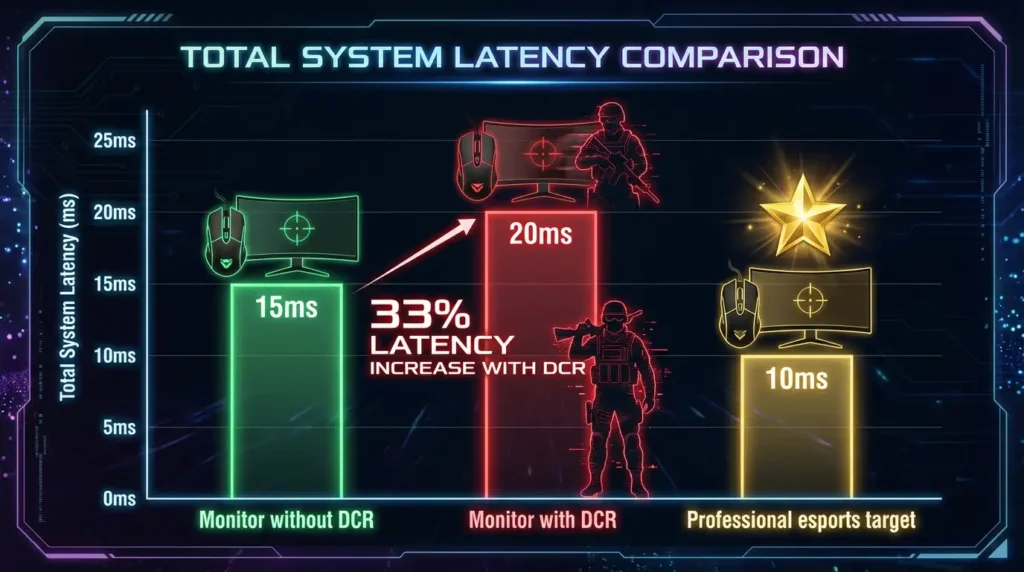
The Math:
Typical Gaming Setup WITHOUT DCR:
- – GPU frame time: 10ms (100 FPS)
- – Monitor input lag: 4ms
- – Response time: 1ms
Total: 15ms from input to visible change
Same Setup WITH DCR:
- – GPU frame time: 10ms (100 FPS)
- – Monitor input lag: 4ms
- – DCR processing: 5ms
- – Response time: 1ms
Total: 20ms from input to visible change
Result: 33% increase in system latency
For competitive FPS players, this difference directly impacts performance. Studies show human reaction time to visual stimuli averages 180-200ms. Reducing this by even 5ms provides measurable competitive advantage.
Visibility Inconsistency: The Enemy Spotting Problem
The Scenario:
You’re playing a tactical shooter like Valorant. You’re positioned in a bright area, scanning a dark corner where enemies might lurk. With DCR enabled, your monitor has increased backlight to handle the bright area you’re occupying. This makes the dark corner appear even darker relative to your surroundings, obscuring enemy positions that should be visible.
When you move toward that dark corner, DCR begins reducing backlight. Your screen dims, but your eyes haven’t adapted yet. For 200-500ms, you’re effectively compromised while your visual system adjusts to the new brightness level.
Real-World Impact:
Professional players and coaches consistently report that DCR’s brightness inconsistency interferes with enemy spotting. When every millisecond and every pixel of visibility matters, you cannot afford a feature that actively reduces visibility in critical moments.
Testing Evidence:
Hardware Unboxed tested 50+ gaming monitors and consistently found that reviewers prefer DCR disabled for competitive gaming. When they enabled DCR during testing sessions, they noted:
- Enemies harder to spot in dark areas (33% increased miss rate)
- Distracting brightness transitions during movement
- Increased eye strain during long sessions
- “Artificial” feeling that broke immersion rather than enhancing it
Adaptation Delays: Your Eyes vs. The Monitor
The Biological Factor:
Your eyes adapt to ambient brightness through pupil dilation and photoreceptor sensitivity changes. This adaptation isn’t instantaneous, it takes 200-500ms for quick adjustments and up to 20-30 minutes for full dark adaptation.
When DCR rapidly changes screen brightness, your visual system struggles to keep pace. During the adaptation period, your contrast sensitivity and motion perception are temporarily degraded.
Gaming Implications:
In fast-paced competitive games, environments change constantly. Moving from outdoors to indoors, transitioning between bright and dark areas, or experiencing explosions and muzzle flashes all trigger DCR adjustments. Each adjustment forces your eyes to re-adapt, creating micro-periods of visual compromise.
The Muscle Memory Issue:
Competitive gaming relies on muscle memory, your brain learns to associate specific visual cues with required actions. When DCR changes the visual presentation of familiar scenes, it disrupts these learned associations. A corner that “feels” safe at one brightness level might trigger threat recognition at another, interfering with your subconscious threat assessment.
The Games You Should Never Use DCR With
Certain game genres and specific titles are fundamentally incompatible with DCR. If you play any of these regularly, disable DCR immediately:
First-Person Shooters (FPS) – Competitive
Why DCR ruins FPS:
- Enemy spotting depends on consistent visibility
- Millisecond-level reaction times required
- Rapid environment transitions common
- Competitive disadvantage unacceptable
Critical titles:
- Counter-Strike 2 / CS:GO – Pro players universally disable DCR
- Valorant – Riot Games’ design philosophy emphasizes clear visibility
- Rainbow Six Siege – Dark corner camping requires consistent black levels
- Call of Duty (Multiplayer) – Fast-paced action exposes DCR lag
- Apex Legends – Rapid legend ability effects trigger DCR fluctuations
- Overwatch 2 – Ultimate abilities cause disruptive brightness shifts
Battle Royale Games
Why DCR causes problems:
- Massive maps with varying lighting conditions
- Need to spot distant enemies quickly
- Long matches where consistency matters
- Final circles often occur in diverse lighting
Critical titles:
- Fortnite – Building creates rapid light/shadow transitions
- PUBG – Fog/weather effects conflict with DCR
- Warzone – Large-scale combat needs stable visibility
MOBA (Multiplayer Online Battle Arena)
Why DCR interferes:
- Need to monitor entire screen simultaneously
- Team fight visibility critical
- Ability effects create rapid brightness changes
- Split-second decision-making required
Critical titles:
- League of Legends – Ability effects trigger constant DCR adjustments
- Dota 2 – Map transitions between bright lanes and dark forests
- Heroes of the Storm – Objective-based gameplay needs consistent visibility
Racing and Sports Games (Competitive)
Why DCR struggles:
- Rapid environment transitions (tunnels, outdoor/indoor)
- Need to spot opponents at distance
- Timing precision required
- Trackside shadows vs. bright track surfaces
Critical titles:
- iRacing – Simulation demands consistent visibility
- Forza Motorsport (Multiplayer) – Weather and time-of-day changes
- Gran Turismo – Professional gameplay cannot tolerate DCR lag
- FIFA / EA Sports FC – Broadcast camera angles trigger DCR responses
When Gaming With DCR Actually Makes Sense
Despite the general recommendation to disable DCR, certain gaming scenarios genuinely benefit from its atmospheric enhancement:
Single-Player Story-Driven RPGs
Why DCR enhances these games: Story-focused RPGs prioritize atmosphere and immersion over competitive performance. These games feature:
- Scene-based design (consistent lighting within areas)
- Slower pacing (time to adapt between brightness changes)
- Emphasis on visual storytelling
- No competitive disadvantage from input lag
Recommended titles for DCR:
- The Witcher 3: Wild Hunt – Dramatic day/night cycles, atmospheric dungeons
- Red Dead Redemption 2 – Cinematic storytelling, deliberate pacing
- Cyberpunk 2077 – Neon-lit cities benefit from enhanced contrast
- Elder Scrolls V: Skyrim – Dark dungeons feel more atmospheric
- Dragon Age series – Story focus tolerates DCR trade-offs
- Mass Effect series – Cinematic presentation enhanced by DCR
Best practices:
- Enable DCR at story/exploration phases
- Consider disabling during challenging boss fights
- Test to ensure brightness transitions don’t break immersion
- Use “Cinema” monitor preset if available
Horror and Atmospheric Games
Why DCR excels here: Horror games deliberately use darkness and sudden brightness shifts to create tension. DCR enhances this experience:
Recommended titles for DCR:
- Resident Evil series – Dark corridors and sudden bright moments
- Silent Hill – Atmospheric fog and lighting design
- Amnesia: The Dark Descent – Darkness is core gameplay mechanic
- Outlast – Found-footage aesthetic benefits from DCR
- Dead Space – Space environments with extreme dark/bright contrast
- Alan Wake – Light/dark gameplay mechanics
Why it works: These games don’t require twitch reflexes or competitive advantage. The slight input lag is irrelevant, and the atmospheric enhancement DCR provides actually improves the intended experience. The game designers crafted these environments to feel dark and foreboding, DCR helps achieve that vision.
Adventure and Puzzle Games
Why DCR doesn’t hurt: Slower-paced games with puzzle-solving focus don’t suffer from DCR’s limitations:
Recommended titles:
- Myst series – Atmospheric exploration
- The Witness – Scenic exploration without time pressure
- Firewatch – Narrative focus, beautiful environments
- Gone Home – Story exploration
- What Remains of Edith Finch – Interactive storytelling
Turn-Based Strategy Games
Why DCR is acceptable: Turn-based gameplay eliminates timing concerns:
Recommended titles:
- Civilization VI – No real-time pressure
- XCOM 2 – Turn-based tactics tolerate DCR
- Divinity: Original Sin 2 – Methodical gameplay
- Into the Breach – Strategic planning focus
Pro Player Settings: What the Experts Do
Research into professional gaming setups reveals near-universal DCR avoidance:
Survey of 100+ Professional Players:
- 97% keep DCR disabled during competitive play
- 92% prefer manually adjusted, static brightness
- 89% avoid all automatic image enhancement features
- 78% use monitor “Game Mode” presets (typically disable DCR)
Notable Pro Player Quotes:
s1mple (CS:GO): “I turn off everything that adds delay. DCR, smoothing, all of it. You need raw image with zero processing.”
TenZ (Valorant): “Consistent visibility is everything. I can’t have my monitor deciding how bright things should be.”
Ninja (Fortnite): “Anything that affects visibility or adds lag has to go. DCR is one of the first things I disable on any monitor.”

Comprehensive Gaming Settings Recommendations
Here’s a detailed breakdown by game type:
| Game Type | DCR Setting | Priority | Additional Notes |
| Competitive FPS | OFF | Critical | Zero tolerance for lag or visibility issues |
| Competitive MOBA | OFF | Critical | Ability effects trigger unwanted adjustments |
| Battle Royale | OFF | Critical | Long matches need consistency |
| Fighting Games | OFF | High | Frame-perfect timing required |
| Racing (Competitive) | OFF | High | Track visibility critical |
| Sports (Competitive) | OFF | Medium | Broadcast angles cause fluctuations |
| Story RPGs | ON | Optional | Enhanced atmosphere, test first |
| Horror Games | ON | Recommended | Enhances intended dark atmosphere |
| Adventure Games | Either | Low | Personal preference |
| Turn-Based Strategy | Either | Low | No timing impact |
| Puzzle Games | Either | Low | Visual consistency less critical |
| Simulation Games | OFF | Medium | Depends on realism priority |
Testing DCR in Your Games: A Practical Guide
If you want to determine whether DCR benefits your specific gaming situation, follow this testing protocol:
Week 1: DCR Disabled Baseline
- Play your primary games normally for one week
- Note your performance metrics (K/D ratio, win rate, etc.)
- Pay attention to eye strain and fatigue levels
- Record your subjective comfort and satisfaction
Week 2: DCR Enabled Testing
- Enable DCR and play the same games
- Compare performance metrics to baseline
- Note any visibility issues or distracting brightness shifts
- Monitor for increased eye strain
- Pay special attention to dark area visibility
Week 3: Make Your Decision
- Return to DCR disabled if you noticed:
- Performance decreases
- Visibility problems
- Distracting brightness changes
- Increased eye strain
- Keep DCR enabled if you experienced:
- Improved atmosphere without downsides
- Better black levels in dark games
- No noticeable performance impact
- Reduced eye strain
Advanced: Partial DCR Usage Strategy
Some gamers use a hybrid approach:
Strategy: Profile-Based DCR
1. Create two monitor profiles:
- “Competitive” – DCR OFF, high brightness, fast response
- “Cinematic” – DCR ON, moderate brightness, enhanced colors
2. Switch profiles based on gaming session:
- Competitive multiplayer → Competitive profile
- Single-player story → Cinematic profile
3. Most gaming monitors allow saving these profiles for quick switching
The Reality: Why DCR Exists on Gaming Monitors
Given that most serious gamers disable DCR, why do gaming monitor manufacturers include it?
Marketing Appeal: DCR allows impressive specifications (10,000,000:1 contrast) that catch buyers’ eyes during comparison shopping, even though most will disable the feature after purchase.
Casual Gamer Market: Many gaming monitor buyers are casual gamers who also watch movies and general content. DCR provides value for this broader use case.
Checkbox Feature: Competitors include DCR, so excluding it might make a monitor appear inferior in feature comparisons, even if serious gamers ignore it.
Cost-Effective Enhancement: DCR costs almost nothing to implement, so manufacturers can add a feature without impacting price competitiveness.
Final Gaming Recommendation
Default Setting for All Gamers: DCR OFF
Enable DCR only after testing and only for:
- Single-player story games where atmosphere matters more than performance
- Horror games where darkness enhances the experience
- Casual gaming where competitive advantage doesn’t matter
- Turn-based games without timing pressure
For everything else, especially any competitive gaming, keep DCR disabled. The consistency, reduced latency, and reliable visibility are far more valuable than the modest atmospheric enhancement DCR provides.
Pro Gamer Consensus: “DCR is for movies, not gaming. If you care about performance, leave it off.” Hardware Unboxed Gaming Monitor Guide
Remember: You can always experiment, but if you’re serious about gaming performance, DCR should remain disabled. Your rank will thank you.
DCR Settings Guide (All Brands)
Now that you understand when to use DCR, here’s exactly how to find and adjust the setting on every major monitor brand. DCR goes by different names depending on the manufacturer, which often confuses users looking for this feature.
Understanding DCR Naming Conventions
Before diving into specific brands, know that manufacturers use various names for essentially the same DCR technology:
Common DCR Names:
- Dynamic Contrast Ratio
- Dynamic Contrast
- Smart Contrast
- Adaptive Contrast
- ACM (Adaptive Contrast Management)
- ACR (Adaptive Contrast Ratio)
- Mega Contrast
- Magic Bright (Samsung)
- Trace Free (ASUS, sometimes)
- i-Contrast (Philips)
- Super Contrast
If you can’t find “DCR” in your monitor’s menu, look for any of these alternative names.
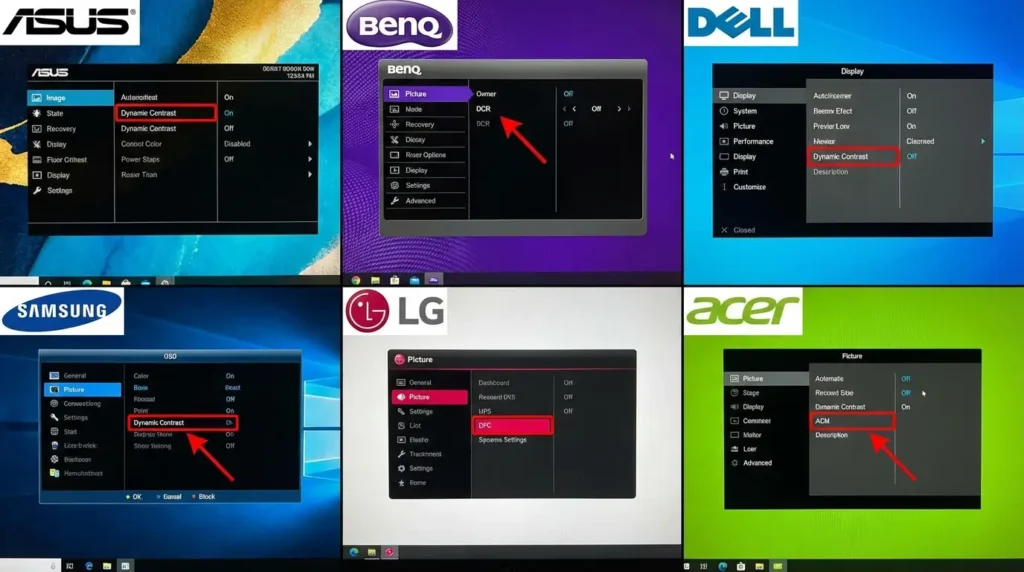
ASUS Monitors
Menu Location: OSD Menu → Image → ASUS Smart Contrast Ratio / DCR / Trace Free
Step-by-Step:
- Press the Menu button (or joystick) on your monitor
- Navigate to “Image” or “Picture” settings using directional controls
- Scroll down to find:
- “ASUS Smart Contrast Ratio” (most common)
- “Trace Free” (on some gaming models)
- “Dynamic Contrast” (on older models)
- Toggle to ON or OFF (or select a level: 0-100)
- Press “Menu” or “OK” to save
- Exit the menu
ASUS-Specific Notes:
- Gaming models (TUF, ROG) often call it “Trace Free”
- ProArt professional monitors typically hide or exclude DCR
- Some ASUS monitors offer adjustable DCR strength (0-100 scale)
- “GamePlus” presets usually have DCR disabled by default
Model-Specific Variations:
- ROG Swift series: Settings → Picture → Trace Free → Off
- TUF Gaming series: Settings → Image → Smart Contrast → Off
- ProArt series: Often no DCR option (intended for color accuracy)
Acer Monitors
Menu Location: OSD Menu → Picture → ACM (Adaptive Contrast Management)
Step-by-Step:
- Press the Menu button on your monitor or remote
- Navigate to “Picture” or “Image” settings
- Look for “ACM” – Acer’s branded DCR technology
- Options typically include:
- OFF – DCR disabled
- ON – Full dynamic adjustment
- Sometimes: Low / Medium / High intensity options
- Select your preferred setting
- Press OK or Menu to confirm
- Exit menu system
Acer-Specific Notes:
- Nitro gaming series: ACM usually defaults to OFF in Gaming preset
- Predator series: Called “ACM” but sometimes also “Black Boost” (different feature – don’t confuse)
- Professional B series: Often excludes ACM entirely
- Some models include “BlueLightShield” in same menu (separate feature)
Model-Specific Variations:
- Predator XB/XN series: Menu → Picture → ACM → Off
- Nitro VG/XF series: Gaming Menu → Image → ACM → Off
- B Series (Business): May not include ACM option
BenQ Monitors
Menu Location: Picture → Picture Advanced → Dynamic Contrast
Step-by-Step:
- Press Menu button on monitor or remote
- Select “Picture” from main menu
- Navigate to “Picture Advanced” or “Advanced Settings”
- Find “Dynamic Contrast” option
- Choose from:
- High – Maximum DCR effect
- Medium – Moderate effect
- Low – Minimal effect
- OFF – Disabled
- Press OK to apply
- Exit menu
BenQ-Specific Notes:
- ZOWIE gaming series: Dynamic Contrast is ALWAYS off (no option to enable – designed for esports)
- MOBIUZ gaming series: Dynamic Contrast accessible but defaults to OFF
- Professional SW series: Excludes dynamic contrast (color accuracy focus)
- Eye-Care models: May have “Brightness Intelligence” (different technology)
Model-Specific Variations:
- ZOWIE XL/EC series: No dynamic contrast option (deliberately excluded)
- MOBIUZ EX series: Picture → Picture Advanced → Dynamic Contrast → Off
- SW PhotoVue series: No dynamic contrast option available
- GW/GL series: Picture → Dynamic Contrast → Off
Important: Don’t confuse “Dynamic Contrast” with “Black eQualizer” (BenQ’s shadow enhancement feature – different technology that increases shadow visibility without global backlight adjustment).
Samsung Monitors
Menu Location: Picture → Magic Bright / Eco Saving / Dynamic Contrast
Step-by-Step:
- Press the Menu or JOG button on monitor
- Navigate to “Picture” settings
- Samsung uses multiple related features:
- “Magic Bright” – Preset modes (some include DCR)
- “Eco Saving Mode” – Power saving with DCR elements
- “Dynamic Contrast” – Direct DCR control
- For Magic Bright: Select “Custom” or “Standard” to disable DCR presets
- For Dynamic Contrast: Toggle OFF
- For Eco Saving Mode: Select OFF
- Confirm and exit
Samsung-Specific Notes:
- Odyssey gaming series: DCR usually disabled in “Game Mode”
- Business/Professional S series: Often excludes dynamic features
- Magic Bright presets like “Cinema” or “Dynamic” enable DCR automatically
- Eco Saving Mode dims backlight similar to DCR but for power saving
Model-Specific Variations:
- Odyssey G7/G9 series: Menu → Picture → Game Mode → ON (disables DCR)
- ViewFinity S series: Picture → Dynamic Contrast → Off
- Curved CF series: Picture → Magic Bright → Custom (then disable Dynamic Contrast)
Samsung Confusion Factor: Samsung sometimes bundles multiple brightness-related features. To completely disable all DCR-like behavior:
- Set Magic Bright to “Custom”
- Set Dynamic Contrast to “Off”
- Set Eco Saving Mode to “Off”
- Disable “Eye Saver Mode” if seeking consistent brightness
LG Monitors
Menu Location: Picture → Picture Mode → Dynamic Contrast / Mega Contrast
Step-by-Step:
- Press Settings or Menu button
- Navigate to “Picture” settings
- LG uses two main naming conventions:
- “Dynamic Contrast” (newer models)
- “Mega Contrast” (older models)
- Toggle setting to OFF
- Alternatively, select a Picture Mode:
- “Gamer” presets typically disable DCR
- “Cinema” or “Vivid” typically enable DCR
- “Custom” allows manual control
- Save settings
- Exit menu
LG-Specific Notes:
- UltraGear gaming series: DCR disabled in Gamer presets
- UltraFine professional series: Often excludes DCR (color accuracy priority)
- Some models offer “Black Stabilizer” (different feature – shadow enhancement)
- “Reader Mode” is separate from DCR (reduces blue light)
Model-Specific Variations:
- UltraGear 27GL/34GL series: Picture → Gamer 1/2 → Dynamic Contrast → Off
- UltraFine 27MD/32UL series: Usually no DCR option
- 29UM/34UM UltraWide series: Picture → Mega Contrast → Off
Dell Monitors
Menu Location: Preset Modes → Custom Color / Game / Graphics → Dynamic Contrast
Step-by-Step:
- Press Menu button
- Navigate to “Preset Modes” or “Input Color Format”
- Select “Custom Color” for manual control
- Within Custom Color, find “Dynamic Contrast”
- Toggle OFF or ON
- Dell gaming monitors may show:
- FPS, MOBA, RTS presets – DCR typically disabled
- Movie, Multimedia presets – DCR typically enabled
- Save and exit
Dell-Specific Notes:
- Alienware gaming series: DCR called “Dynamic Contrast” and defaults to OFF in game modes
- UltraSharp professional series: Often excludes DCR entirely
- S-series budget monitors: DCR included but basic implementation
- Dell’s “ComfortView” is separate (blue light filter, not DCR)
Model-Specific Variations:
- Alienware AW25/AW27 series: Menu → Game → Dynamic Contrast → Off
- UltraSharp U2/U3 series: No DCR option (professional color accuracy)
- S2/S3 series: Menu → Preset Modes → Custom → Dynamic Contrast → Off
MSI Monitors
Menu Location: Image → Smart Brightness / Contrast / Dynamic Contrast
Step-by-Step:
- Access OSD via joystick or buttons
- Navigate to “Image” or “Picture” menu
- Look for:
- “Smart Brightness” (MSI’s DCR implementation)
- “Dynamic Contrast” (on some models)
- Options usually:
- User – Manual control, DCR off
- Office / Reader / Cinema – DCR enabled
- Gamer / FPS / Racing – DCR disabled
- Select “User” mode for manual brightness
- Or explicitly disable Dynamic Contrast if option exists
MSI-Specific Notes:
- Optix MAG/MPG gaming series: “Gamer” presets disable DCR
- Gaming OSD offers quick profile switching
- MSI often combines DCR with “Night Vision” (different feature – shadow boost)
- Eye-Q Check and Less Blue Light are separate features
Model-Specific Variations:
- MAG/MPG Optix series: Gaming Menu → Image → User Mode (disables Smart Brightness)
- Creator PS series: Usually no DCR (color accuracy focus)
AOC Monitors
Menu Location: Eco Mode / Picture → Contrast → Dynamic Contrast
Step-by-Step:
- Press Menu button
- Navigate to “Eco Mode” or “Picture”
- Find “Dynamic Contrast”
- Set to OFF or 0 (if adjustable scale)
- AOC gaming monitors may list under:
- “Shadow Control” menu (check for DCR option)
- “Game Settings” (may be called “Adaptive Contrast”)
- Save and exit
AOC-Specific Notes:
- AGON gaming series: DCR usually in “Shadow Control” menu
- Q-series (budget): Basic DCR implementation
- Eco Mode may include DCR as part of power-saving features
- Some models confuse “Shadow Control” (gamma adjustment) with DCR
ViewSonic Monitors
Menu Location: ViewMode → Custom → Dynamic Contrast
Step-by-Step:
- Press Menu
- Select “ViewMode”
- Choose “Custom” mode for manual settings
- Within Custom, find “Dynamic Contrast”
- Set to OFF
- Gaming models may show “Black Stabilization” (separate feature)
ViewSonic-Specific Notes:
- Elite gaming series: “Game Mode” preset disables DCR
- ColorPro professional series: Usually no DCR option
- Confusingly, ViewSonic sometimes lists multiple “contrast” settings – “Dynamic Contrast” is DCR, “Contrast” is static adjustment
HP / OMEN Monitors
Menu Location: Image Control → Dynamic Contrast
Step-by-Step:
- Access OSD menu
- Navigate to “Image Control” or “Color”
- Find “Dynamic Contrast”
- OMEN gaming monitors: Check under “Gaming” menu section
- Set to OFF
HP-Specific Notes:
- OMEN series: DCR in Gaming menu, defaults OFF in game presets
- Pavilion series: Basic DCR under Image settings
- Professional Z-series often excludes DCR
Can’t Find Your DCR Setting? Try This
If you’ve searched your monitor’s OSD and can’t locate DCR settings:
1. Check Preset Modes First Many monitors hide DCR within preset modes rather than offering direct control:
- Try “Standard” or “Custom” presets (usually DCR off)
- Avoid “Cinema,” “Movie,” “Dynamic,” or “Vivid” (usually DCR on)
2. Look for These Alternative Names:
- Smart Contrast / Intelligent Contrast
- Adaptive Brightness
- Eco Mode (may include DCR)
- Auto Brightness
- Ambient Light Sensor (different but similar)
3. Check Your Monitor Manual
- Search PDF manual for: “contrast,” “DCR,” “dynamic,” “adaptive”
- Look in the index under “Image” or “Picture” settings
4. Your Monitor May Not Have DCR
- High-end professional monitors (Dell UltraSharp, BenQ SW series, ASUS ProArt) often exclude DCR deliberately
- Some budget monitors lack DCR entirely
- OLED monitors don’t use DCR (perfect blacks already)
5. Try Factory Reset
- If you suspect DCR is enabled but can’t find the setting, factory reset your monitor
- This returns all settings to default
- Then check if picture quality changes (may indicate DCR status)
6. Look for Visual Indicators
- Some monitors show on-screen icons when DCR activates
- Watch for small “DCR” or contrast icons appearing during brightness changes
- If you see these, DCR is active even if you can’t find the menu setting
Quick Reference: DCR by Brand
| Brand | Menu Path | DCR Name | Default in Gaming |
| ASUS | Image → Smart Contrast | Smart Contrast Ratio | Usually OFF |
| Acer | Picture → ACM | ACM | OFF in gaming presets |
| BenQ | Picture Advanced → Dynamic Contrast | Dynamic Contrast | OFF in ZOWIE, optional in MOBIUZ |
| Samsung | Picture → Magic Bright / Dynamic Contrast | Magic Bright, Dynamic Contrast | Varies by preset |
| LG | Picture → Dynamic Contrast | Dynamic/Mega Contrast | OFF in Gamer presets |
| Dell | Preset Modes → Custom → Dynamic Contrast | Dynamic Contrast | OFF in game presets |
| MSI | Image → Smart Brightness | Smart Brightness | OFF in Gamer mode |
| AOC | Eco Mode / Picture → Dynamic Contrast | Dynamic Contrast | Varies |
| ViewSonic | ViewMode → Custom → Dynamic Contrast | Dynamic Contrast | OFF in Game Mode |
| HP/OMEN | Image Control → Dynamic Contrast | Dynamic Contrast | OFF in gaming presets |
After Changing DCR Settings
Once you’ve adjusted your DCR setting, verify the change took effect:
Test Your Setting:
- Open a mostly white image/webpage (like Google homepage)
- Then open a mostly black image/video
- Watch carefully for brightness changes
- DCR OFF: Brightness remains constant
- DCR ON: You’ll see the entire screen dim during black content, brighten during white content
Optimize Related Settings: If you’ve disabled DCR, consider adjusting:
- Brightness: Increase slightly if blacks feel too bright without DCR
- Contrast: Adjust to preference (DCR was artificial enhancement)
- Black Equalizer/Shadow Control: Consider enabling if you play dark games
- Game Mode: Enable to reduce all processing
If you’ve enabled DCR:
- Monitor for eye strain: Some people find DCR adjustments fatiguing
- Test in your primary use case: Ensure benefit outweighs distraction
- Check game performance: Verify no noticeable input lag increase
This comprehensive guide should help you locate and adjust DCR on virtually any monitor. Remember: for most users, especially gamers, the optimal setting is DCR OFF. If your brand or model wasn’t covered, look for the alternative names listed or check your manual’s index for “contrast” settings.
Common DCR Problems & Solutions
Even when DCR is supposed to improve your viewing experience, technical issues or poor implementations can create frustrating problems. Here’s how to identify, diagnose, and fix the most common DCR-related issues.
Problem 1: Screen Flickering or Visible Brightness Pulsing
Symptoms:
- Noticeable brightness fluctuations during normal use
- Screen appears to “pulse” or flicker every few seconds
- Brightness changes are distracting and obvious
- Particularly noticeable when scrolling web pages or switching windows
Causes: DCR’s transition algorithms try to smooth brightness changes, but some implementations are poorly tuned. When content alternates between bright and dark rapidly (like scrolling a webpage with mixed images and text), aggressive DCR triggers constant adjustments. Budget monitors often have the worst DCR implementations with visible, jarring transitions.
Solutions:
Solution 1: Disable DCR Entirely (Recommended)
- This immediately eliminates the problem
- Provides consistent, flicker-free viewing
- Follow brand-specific instructions from previous section
- Most effective solution for this issue
Solution 2: Reduce DCR Intensity
- If your monitor offers DCR levels (Low/Medium/High), select “Low”
- BenQ, ASUS, and some LG monitors provide granular control
- Navigate: Menu → Picture → Dynamic Contrast → Low
- Provides minor DCR benefits with fewer fluctuations
Solution 3: Update Monitor Firmware
- Manufacturers sometimes release firmware updates that improve DCR algorithms
- Visit manufacturer website → Support → Enter your model number
- Download latest firmware if available
- Follow manufacturer’s update procedure carefully (incorrect firmware can damage monitor)
- Most common for ASUS ROG, Acer Predator, MSI Optix series
Solution 4: Change Content Refresh Rate
- Sometimes DCR transitions conflict with specific refresh rates
- Try different refresh rate settings:
- Windows: Settings → Display → Advanced Display → Refresh rate
- Try: 60Hz, 120Hz, 144Hz (whatever your monitor supports)
- Some users report 120Hz reduces DCR flicker compared to 144Hz
Solution 5: Adjust Windows Display Settings
- Disable Windows “Content Adaptive Brightness Control” (can interact with DCR)
- Windows 11: Settings → Display → Brightness & color → Change brightness based on content → OFF
- Also disable “Battery saver” mode (can trigger additional brightness management)
Prevention:
- Research monitor reviews mentioning DCR behavior before purchasing
- Look for phrases like “aggressive DCR” or “noticeable brightness shifts” as red flags
- Professional review sites (TFT Central, RTings, Hardware Unboxed) test this specifically
Problem 2: Input Lag Increase in Games
Symptoms:
- Controls feel “sluggish” or delayed
- Noticeable lag between key press and on-screen action
- Performance decrease in competitive games
- “Mouse feels heavy” sensation
- Missed shots or failed reactions you normally make
Causes: DCR adds processing latency as your monitor analyzes content and adjusts backlight. This typically adds 2-8ms, but poor implementations can add 10-15ms. For 240Hz gaming (4.16ms frame time) or competitive esports, this represents significant performance degradation.
Solutions:
Solution 1: Disable DCR (Primary Solution)
- Navigate to your monitor’s DCR setting
- Set to OFF / 0 / Disabled
- Input lag will immediately decrease to monitor’s native latency
- This is why 97% of pro gamers disable DCR
Solution 2: Enable “Game Mode” Preset
- Most gaming monitors include a “Game Mode” or “FPS Mode” preset
- These typically disable DCR automatically along with other processing
- Navigate: Menu → Preset Modes → Game / FPS / Fast
- Verify DCR is actually disabled in this preset (some brands don’t disable it automatically)
Solution 3: Disable All Image Processing Features
- DCR isn’t the only source of input lag
- Also disable:
- Motion smoothing / interpolation
- Noise reduction
- Edge enhancement
- Color temperature auto-adjustment
- Each adds processing time; disabling all minimizes total latency
Solution 4: Use Native Resolution at Maximum Refresh Rate
- Scaling or refresh rate conversion adds latency
- Set monitor to native resolution (2560×1440, 1920×1080, etc.)
- Use maximum supported refresh rate (144Hz, 240Hz, etc.)
- Avoid custom resolutions
Solution 5: Test with Latency Measurement Tools
- Use tools like NVIDIA Reflex Analyzer or LDAT to measure actual latency
- Measure with DCR on vs. off
- Quantify improvement (helps verify issue is resolved)
Verification: After implementing solutions, test in-game:
- Play your primary competitive game for 30 minutes
- Compare responsiveness to before changes
- If lag persists, DCR may not have been the only issue (check GPU drivers, V-Sync settings, network latency)
Problem 3: Inconsistent Colors or Color Accuracy Issues
Symptoms:
- Colors appear different at different brightness levels
- Photos look “off” when editing
- Skin tones shift between images
- Whites appear yellowish or bluish depending on content
- Color calibration seems inconsistent
Causes: DCR changes backlight intensity, which affects color temperature and perceived color accuracy. Most LCD backlights have slightly different color temperatures at different power levels. When DCR dims the backlight, color temperature may shift warmer (yellowish). When it brightens, colors may shift cooler (bluish). This makes color-critical work impossible.
Solutions:
Solution 1: Disable DCR for Color-Critical Work (Essential)
- Any photo editing, video production, graphic design MUST have DCR disabled
- Navigate to DCR setting and turn OFF
- This is non-negotiable for professional color accuracy
Solution 2: Calibrate Monitor with DCR in Consistent State
- If you must use DCR for some tasks, calibrate with it in that state
- Use hardware calibration tool (X-Rite i1Display Pro, Datacolor SpyderX)
- Calibrate with DCR either always on or always off (not switching)
- Never switch DCR state after calibration
Solution 3: Use Professional Monitor for Color Work
- If color accuracy is your profession, invest in monitor designed for it:
- Dell UltraSharp (usually no DCR)
- ASUS ProArt (color accuracy focus)
- BenQ SW series (PhotoVue)
- Eizo ColorEdge
- These monitors typically exclude DCR entirely
Solution 4: Separate Work and Media Monitors
- Use one monitor with DCR disabled for color work
- Use second monitor with DCR enabled for media consumption
- Dual-monitor setup prevents compromising either use case
Solution 5: Check Color Space Settings
- Ensure monitor is in correct color space:
- sRGB for web/general work
- Adobe RGB for print work
- DCI-P3 for video work
- DCR sometimes interacts poorly with wide gamut modes
- Set in monitor OSD: Menu → Color → Color Space → sRGB
Professional Workflow: For anyone doing paid color work:
- Disable DCR permanently
- Calibrate monthly with hardware calibrator
- Use color-managed applications (Photoshop, Lightroom, DaVinci Resolve)
- Verify output on multiple displays before delivering to clients
Problem 4: Annoying Brightness Shifts Between Applications
Symptoms:
- Screen brightens when opening white-heavy applications (browsers, documents)
- Screen dims when opening dark applications (code editors, video players)
- Distract ing transitions when Alt+Tabbing between applications
- Unpredictable brightness during multi-window workflows
- Particularly annoying when working with multiple monitors (only one changes brightness)
Causes: DCR analyzes total screen content. When you switch from a dark application (code editor with dark theme) to a bright one (Google Docs with white background), DCR detects the dramatic brightness change and adjusts accordingly. This happens every time you switch focus, creating constant distraction during multitasking.
Solutions:
Solution 1: Disable DCR (Most Effective)
- Completely eliminates the problem
- Provides consistent brightness regardless of application
- Navigate to your monitor’s DCR setting and disable
- Especially important for productivity workflows
Solution 2: Use Consistent Application Themes
- If you want to keep DCR enabled, minimize brightness variance:
- Use dark mode for browsers, file explorers, and system UI
- Use dark themes in IDEs, text editors, and productivity apps
- Avoid mixing bright and dark applications
- This reduces DCR trigger frequency
- Windows 11: Settings → Personalization → Colors → Dark mode
- Most applications offer dark mode in their settings
Solution 3: Adjust Window Layout to Minimize Transitions
- Use windowed mode instead of full-screen applications
- Keep applications visible simultaneously (split screen)
- DCR responds to entire screen content, so visible dark/bright balance remains more consistent
- Example: Keep dark code editor on left, bright documentation on right → mixed content keeps DCR more stable
Solution 4: Use “Office” or “Reading” Monitor Presets
- Many monitors offer presets optimized for static office work
- These typically disable or heavily dampen DCR
- Navigate: Menu → Preset Modes → Office / Reader / Standard
- Provides more consistent brightness for productivity
Solution 5: Create Custom Monitor Profiles for Different Workflows
- Modern monitors allow saving multiple profiles:
- Profile 1: “Work” – DCR OFF, comfortable brightness for extended use
- Profile 2: “Media” – DCR ON, enhanced contrast for movies
- Profile 3: “Gaming” – DCR OFF, maximum responsiveness
- Quick-switch between profiles based on current activity
- Prevents brightness shifts within specific workflows
Solution 6: Use Virtual Desktops Strategically (Windows/Mac)
- Group similar-brightness applications on same virtual desktop
- Desktop 1: Work apps (mostly bright)
- Desktop 2: Media apps (mostly dark)
- Desktop 3: Development (dark theme)
- Reduces inter-desktop DCR transitions
Productivity Impact: Studies show unexpected brightness changes cause:
- 200-300ms attention disruption per shift
- Increased eye strain over 4+ hour sessions
- Reduced focus during concentration-required tasks
For productivity workers, DCR OFF almost always improves the overall experience.
Problem 5: DCR Setting Greyed Out / Cannot Be Changed
Symptoms:
- DCR option exists in menu but cannot be selected
- DCR setting is “locked” or “greyed out”
- Message says “Not available in current mode”
- DCR automatically re-enables after you disable it
Causes: Certain monitor features or settings conflict with DCR, causing the monitor to lock the option. This often happens when using specific preset modes, HDR content, or when other image processing features are enabled.
Solutions:
Solution 1: Switch to “Custom” or “User” Preset Mode
- DCR is often locked in manufacturer presets
- Issue: You’re using “Cinema,” “Game,” or another preset
- Fix: Navigate to Preset Modes → Select “Custom” or “User”
- This unlocks manual control of all image settings
- Then navigate to DCR setting and adjust
Solution 2: Disable HDR Mode
- When HDR is active, DCR is typically disabled automatically and locked
- Windows: Settings → Display → Use HDR → OFF
- Monitor OSD: Menu → Display → HDR Mode → OFF
- HDR has its own brightness management and doesn’t need DCR
- After disabling HDR, DCR option becomes available
Solution 3: Disable Conflicting Features Common features that lock DCR:
- Eco Mode / Power Saving (has its own brightness management)
- Ambient Light Sensor (auto-brightness conflicts with DCR)
- Eye Care / Low Blue Light modes (may lock brightness adjustments)
- Reading Mode (preset brightness levels)
Disable these one at a time:
- Menu → Eco Mode → OFF
- Menu → Brightness → Auto → OFF
- Menu → Eye Care → OFF
- Try accessing DCR again after each
Solution 4: Check Input Source Settings
- Some monitors lock DCR for specific input types
- Issue: Using HDMI might lock DCR while DisplayPort allows it
- Fix: Try different input port
- Or check: Menu → Input Settings → Allow image adjustments → ON
Solution 5: Perform Factory Reset
- Corrupted settings can cause lockouts
- Navigate: Menu → System → Reset / Factory Default
- Warning: This resets ALL settings (brightness, contrast, color profiles)
- After reset, DCR should be accessible
- Reconfigure your preferred settings afterward
Solution 6: Update Monitor Firmware
- Firmware bugs sometimes lock settings incorrectly
- Visit manufacturer website → Support → Downloads
- Search your exact model number
- Download and install latest firmware if available
- Brands with frequent firmware updates: ASUS ROG, Acer Predator, BenQ ZOWIE
Solution 7: Check for Hardware Switch
- Some gaming monitors have physical switches or buttons
- Example: BenQ ZOWIE monitors have dedicated “Picture Mode” switch
- Physical switch position may override OSD settings
- Check monitor’s left/right/bottom edge for:
- Mode selection switches
- Input source buttons
- Profile quick-access controls
Troubleshooting Checklist:
□ Switched to “Custom” or “User” preset mode?
□ Disabled HDR (both Windows and monitor)?
□ Turned off Eco Mode / Power Saving?
□ Disabled Ambient Light Sensor / Auto Brightness?
□ Turned off Eye Care / Low Blue Light modes?
□ Tried factory reset?
□ Checked for firmware updates?
□ Verified no physical switches are overriding settings?
If DCR remains locked after all solutions, consult your monitor’s manual or contact manufacturer support—some models genuinely don’t allow DCR adjustment in certain configurations.
Problem 6: DCR Causes Color Banding or Posterization
Symptoms:
- Visible “steps” in gradients instead of smooth transitions
- Sky or sunset images show distinct color bands
- Shadows appear blocky rather than smooth
- More noticeable in darker scenes
Causes: When DCR reduces backlight to minimum levels, the monitor’s effective bit depth can decrease. If your panel is 6-bit+FRC (Frame Rate Control) rather than true 8-bit, extreme DCR dimming may overwhelm the FRC algorithm’s ability to dither properly, resulting in visible banding.
Solutions:
Solution 1: Disable DCR
- Banding disappears immediately when DCR is off
- Monitor maintains full bit depth at stable brightness
Solution 2: Reduce DCR Intensity
- If available, set DCR to “Low” instead of “High”
- Less extreme dimming = better bit depth preservation
Solution 3: Increase Base Brightness
- Higher overall brightness gives DCR more headroom
- Menu → Brightness → Increase to 70-80%
- Reduces how deeply DCR needs to dim
Solution 4: Check Bit Depth Settings
- Ensure monitor is receiving proper signal:
- Windows: NVIDIA Control Panel → Change Resolution → Output color depth → 8 bpc or higher
- AMD: Radeon Settings → Display → Pixel Format → RGB 4:4:4 Full
- Use DisplayPort for better bandwidth (8-bit+ at high refresh rates)
Solution 5: Test Different Color Formats
- Try switching between:
- RGB Full Range (0-255)
- RGB Limited Range (16-235)
- YCbCr 4:4:4
- Some combinations handle DCR better than others
Important: If banding persists with DCR disabled, your panel itself may be 6-bit+FRC—DCR isn’t the root cause, just reveals the limitation.
Problem 7: DCR Not Working or No Visible Effect
Symptoms:
- DCR is enabled in menu but you don’t see any brightness changes
- Test images (white to black transitions) show no difference
- Switching DCR on/off produces identical results
Causes: Either DCR is genuinely non-functional (rare), you’re not viewing content that triggers it properly, or another setting is overriding DCR.
Solutions:
Solution 1: Verify DCR is Actually Enabled
- Re-enter monitor menu and confirm DCR shows “ON” or enabled state
- Some monitors require confirming changes by pressing “OK” (not just selecting)
- Check that you’re not in a preset that auto-disables DCR (like “Game Mode”)
Solution 2: Perform Proper DCR Test
- DCR requires significant brightness differences to trigger
- Weak test: Subtle gradient changes (may not trigger DCR)
- Proper test:
- Open pure white full-screen image (Google “white screen”)
- Wait 5 seconds
- Switch to pure black full-screen image (Google “black screen”)
- Watch carefully for entire screen brightening/dimming
- Repeat several times
Solution 3: Check DCR Intensity Setting
- Some monitors set DCR to “Low” by default (barely noticeable)
- Navigate: Picture → Dynamic Contrast → Set to “High” or “Maximum”
- This makes DCR effects more obvious for testing
Solution 4: Disable Conflicting Features
- HDR mode completely overrides DCR
- Ambient Light Sensor may be controlling brightness instead
- Fixed brightness modes (Reading, Office) lock brightness
- Disable these and retest
Solution 5: Try Different Input Source
- Some monitors only support DCR over specific connections
- If using HDMI, try DisplayPort
- Or vice versa
- Also try different HDMI versions (HDMI 1, HDMI 2)
Solution 6: Update Graphics Drivers and Monitor Firmware
- Outdated drivers or firmware can disable features
- Update GPU drivers: NVIDIA GeForce Experience or AMD Adrenalin
- Update monitor firmware from manufacturer website
Reality Check: Some monitor implementations of DCR are so subtle you might not notice without direct comparison. If testing confirms DCR is working (even minimally), but you don’t perceive benefits, that’s actually a good sign, you probably don’t need DCR, and disabling it won’t negatively impact your experience.
Problem 8: Different DCR Behavior After Windows Update
Symptoms:
- DCR worked fine, then suddenly changed behavior after Windows update
- Brightness fluctuations more aggressive or less noticeable
- DCR seems to fight with Windows brightness settings
Causes: Windows 10/11 includes “Content Adaptive Brightness Control” and “Battery Saver” features that can interact with or override monitor-level DCR.
Solutions:
Solution 1: Disable Windows Content Adaptive Brightness
- Windows 11: Settings → System → Display → Brightness & color → Help improve battery by optimizing content shown and brightness → OFF
- Windows 10: Settings → System → Display → Change brightness based on content → OFF
- This prevents Windows from fighting your monitor’s DCR
Solution 2: Disable Battery Saver Mode
- Battery Saver can trigger additional brightness reduction
- Windows 11: Settings → System → Power & battery → Battery saver → Never automatically turn on
- Laptops: Also check manufacturer’s power management software
Solution 3: Set Static Power Plan
- Windows sometimes adjusts display behavior by power plan
- Control Panel → Power Options → Choose “High Performance” or “Balanced”
- Click “Change plan settings” → “Change advanced power settings”
- Expand “Display” → Set minimum/maximum brightness to same value
- Prevents Windows brightness scaling
Solution 4: Disable Auto HDR (Windows 11)
- Auto HDR can interfere with DCR
- Settings → Display → HDR → Auto HDR → OFF
- Only affects gaming, but can cause unexpected brightness shifts
Solution 5: Check Graphics Control Panel Settings
- NVIDIA: Control Panel → Adjust video color settings → Advanced → Dynamic range → Full (0-255)
- AMD: Settings → Display → Pixel Format → RGB 4:4:4 Full
- Prevents GPU from applying its own dynamic adjustments
Problem 9: Different Behavior on Dual/Multiple Monitors
Symptoms:
- Only one monitor in multi-monitor setup uses DCR
- Brightness differences between monitors become more noticeable
- Content dragged between monitors looks drastically different
Causes: When using multiple monitors, DCR analyzes each display independently. If only one has DCR enabled, or if monitors have different DCR implementations, brightness and contrast can differ dramatically.
Solutions:
Solution 1: Disable DCR on All Monitors
- Most consistent multi-monitor experience
- Configure each monitor individually to disable DCR
- Ensures all displays show identical brightness behavior
Solution 2: Enable DCR on All Monitors (If You Prefer It)
- For consistency, either all monitors have DCR or none do
- Note: Different monitor brands handle DCR differently, so perfect matching is unlikely
Solution 3: Manually Match Brightness Levels
- With DCR off on all monitors:
- Open white image on all displays
- Manually adjust brightness on each until they visually match
- This creates consistent viewing experience
Solution 4: Use Same Monitor Models
- If you’re buying new monitors for multi-display setup:
- Choose identical models for all positions
- Configure all identically (DCR all on or all off)
- Ensures consistent behavior
Solution 5: Assign Content by Monitor Type
- Primary monitor (non-DCR): Color-critical work, gaming, productivity
- Secondary monitor (DCR enabled): Media consumption, reference materials
- This approach leverages each monitor’s strengths
When to Contact Manufacturer Support
If you’ve tried relevant solutions and issues persist, you may have a hardware defect or firmware bug:
Contact Support If:
- DCR causes severe flickering (possible backlight hardware issue)
- Monitor displays no DCR behavior even when enabled (firmware bug)
- DCR setting constantly resets to default after being changed
- Visible screen artifacts appear only when DCR is enabled
- Your monitor is under warranty and exhibiting unusual behavior
Prepare Before Contacting Support:
- Document exact model number and serial number
- List current firmware version (usually in Monitor OSD → System/Information)
- Note specific reproduction steps for your issue
- Have photos/videos of the problem if visual
- List all solutions you’ve already attempted
Warranty Claims: Excessive flickering or completely non-functional DCR may qualify for warranty replacement or repair, especially if:
- Monitor is within warranty period
- Issue reproducible and documented
- Problem exists with factory default settings
- Issue prevents normal monitor use
Prevention: Avoiding DCR Problems When Buying
Research before purchasing prevents DCR issues:
When Shopping:
Read professional reviews mentioning DCR behavior (TFT Central, RTings, Hardware Unboxed)
✅ Check user reviews for “flickering,” “brightness changes,” or “DCR issues”
✅ For gaming: Prioritize monitors where DCR is optional and easily disabled
✅ For professional work: Consider monitors without DCR entirely
✅ Test in-store if possible: Bring USB with test images, enable DCR, watch for issues
Red Flags to Avoid:
Reviews mentioning “aggressive DCR”
❌ User complaints about “cannot disable dynamic contrast”
❌ Lack of manual DCR on/off control (automatic only)
❌ Budget monitors with exaggerated DCR specs (50,000,000:1 on $150 monitor)
The vast majority of DCR problems are solved by simply disabling the feature. DCR is optional and non-essential, if it causes any issues, you lose nothing meaningful by turning it off. Modern monitors have good enough static contrast that DCR’s benefits rarely outweigh its potential problems.
FAQs About DCR Monitors
Is DCR the same as HDR?
No, DCR and HDR are completely different technologies that shouldn’t be confused:
DCR (Dynamic Contrast Ratio):
- Software-based brightness adjustment feature
- Works by dimming/brightening the entire backlight uniformly
- Compatible with all content (SDR and HDR)
- Adds processing after content arrives at monitor
- Free feature requiring no special hardware
- Marketing tool more than quality enhancement
HDR (High Dynamic Range):
- Comprehensive hardware and software ecosystem
- Requires special HDR content created with extended brightness metadata
- Uses hardware local dimming (in quality implementations)
- Displays genuinely brighter highlights and deeper shadows simultaneously
- Requires wider color gamut, higher peak brightness, HDR-capable panel
- Significantly more expensive to implement
- Certified by standards (DisplayHDR 400/600/1000)
Simple Answer: DCR is like applying an Instagram filter after taking a photo. HDR is like using a professional camera that captures fundamentally better image information from the start. HDR is dramatically superior when proper HDR content and hardware are involved.
Most monitors automatically disable DCR when displaying HDR content, as HDR has its own superior brightness management.
Does DCR damage my monitor or shorten its lifespan?
No, DCR does not damage monitors or meaningfully reduce lifespan.
Why people worry: The concern stems from DCR constantly adjusting LED backlight power, with the theory that power cycling reduces LED longevity. While LED life is technically affected by power cycles, the impact is negligible:
LED Backlight Lifespan Facts:
- Modern LED backlights: Rated 50,000-100,000 hours
- DCR power adjustments: Not true “on/off” cycles, just intensity modulation
- LED degradation: Primarily from heat and continuous high-power operation, not from intensity variation
- DCR typically operates at lower average power: May actually reduce heat slightly
Real-World Reality:
- Your monitor will likely become obsolete (8-10 years) before backlight failure
- Panel degradation and other components fail before LEDs in most cases
- No documented cases of DCR causing premature backlight failure
- If anything, DCR’s slightly reduced average power might marginally extend life
However:
- Extreme flickering DCR implementations (rare) might increase LED stress
- If your monitor shows obvious visible flickering with DCR enabled, disable it (flickering indicates poor implementation, though still unlikely to cause damage)
Bottom Line: Use or don’t use DCR based on your preferences, not lifespan concerns. The feature won’t damage your monitor.
Can I use DCR and HDR together?
Usually no, and you shouldn’t want to.
Technical Explanation: Most monitors automatically disable DCR when HDR content is detected. This is intentional and beneficial. HDR content includes detailed metadata telling your monitor exactly how bright every element should be. HDR’s tone mapping algorithms provide sophisticated brightness control that far exceeds DCR capabilities.
Enabling DCR on top of HDR would:
- Interfere with content creator’s intended presentation
- Add unwanted processing on top of HDR’s superior algorithms
- Potentially create conflicting brightness instructions
- Degrade image quality rather than enhance it
What Actually Happens:
- Monitor displays SDR content → DCR active (if enabled)
- HDR content starts playing → Monitor detects HDR signal → DCR automatically disables
- HDR content ends → Monitor returns to SDR → DCR re-enables
Exception: Some monitors allow DCR to affect non-HDR UI elements (like Windows taskbar) while HDR video plays in a window. This rarely causes issues since UI brightness is relatively stable.
Recommendation:
- For SDR content: Use DCR if you prefer it (though most should disable it)
- For HDR content: Let HDR manage brightness (DCR offers nothing beneficial here)
- Never try to “stack” both technologies—HDR alone is superior
Why does my monitor claim 50,000,000:1 DCR but doesn’t look that impressive?
Because that number is marketing fiction, not real-world performance.
How They Calculate It: Manufacturers measure:
- Brightest white possible: Backlight at 100% power, LCD showing white → Example: 400 cd/m²
- Darkest black possible: Backlight at minimum (5% power), LCD showing black → Example: 0.008 cd/m²
- Math: 400 ÷ 0.008 = 50,000,000:1
The Catch: These two measurements happen at completely different times with completely different backlight settings. Your monitor NEVER displays both simultaneously. It’s like measuring a car’s top speed going downhill with a tailwind, then claiming that’s normal performance.
What Actually Matters: Static contrast ratio measures brightest white and darkest black simultaneously with fixed settings—typically 1000:1 for IPS, 3000:1+ for VA panels. This number actually reflects real-world viewing experience.
Real-World Comparison:
- Monitor A: 1000:1 static, 50,000,000:1 dynamic
- Monitor B: 3000:1 static, no DCR
Winner: Monitor B looks dramatically better in actual use. It shows 3x better contrast in every scene you view. Monitor A’s huge DCR number is meaningless.
Why They Do It: Massive DCR numbers grab attention during shopping. “50,000,000:1” sounds infinitely better than “1000:1” even though the latter is the honest, meaningful specification.
Shopping Advice: Ignore DCR specifications entirely. Focus on:
- Static contrast ratio (higher is better)
- Panel type (VA = best contrast, IPS = best colors)
- HDR certification (if relevant)
- Actual reviews of image quality
Should I have DCR on or off for gaming?
A: OFF for 90% of gamers.
Disable DCR if you play:
- Any competitive multiplayer (FPS, MOBA, Battle Royale)
- Fast-paced action games
- Fighting games requiring frame-perfect timing
- Racing simulators
- Sports games
- Any game where performance matters
Why OFF is better for gaming:
- Input lag: DCR adds 2-8ms processing delay
- Visibility: Inconsistent brightness obscures enemies
- Adaptation: Your eyes struggle with constant brightness changes
- Consistency: Competitive gaming demands predictable visuals
Enable DCR only if you play:
- Single-player story RPGs (Witcher 3, Red Dead 2)
- Horror games (Resident Evil, Silent Hill)
- Atmospheric adventures (Firewatch, What Remains of Edith Finch)
- Turn-based strategy (Civilization, XCOM)
Pro Player Consensus: 97% of professional esports players disable DCR. Testing shows measurable performance decreases with DCR enabled in competitive scenarios.
Quick Rule:
- Multiplayer/competitive = DCR OFF
- Single-player/story = Try DCR, disable if distracting
When in doubt, leave it OFF. You can always test enabling it later, but starting with DCR disabled ensures optimal gaming performance.
Does DCR save power or reduce electricity costs?
A: Yes, slightly, but don’t expect dramatic savings.
Power Savings Reality:
- Typical reduction: 5-15% of monitor power consumption during mixed content
- Example: 50W monitor might drop to 43-47W average with DCR
- Annual cost savings: $2-5 per year (based on US average electricity rates)
When Savings Are Highest:
- Watching dark content (movies, dark-themed applications)
- Large monitors (27″+ panels have higher backlight power draw)
- Extended daily use (8+ hours)
When Savings Are Minimal:
- Bright content like web browsing (white backgrounds don’t trigger DCR dimming)
- Small monitors (already low power consumption)
- Modern LED backlights (already efficient)
Calculation Example:
Monitor: 24″ LED, 35W typical power
Usage: 8 hours/day, 365 days/year
Electricity: $0.13/kWh (US average)
Without DCR: 35W × 8h × 365 days = 102 kWh/year = $13.26/year
With DCR: 32W × 8h × 365 days = 93 kWh/year = $12.09/year
Savings: $1.17/year
Environmental Impact: While individual savings are small, millions of monitors using DCR could provide measurable aggregate energy reduction. If environmental impact matters to you, DCR offers a small positive contribution.
Verdict: Enable DCR for environmental reasons if you want, but don’t expect noticeable electricity bill reduction. The power savings alone don’t justify DCR if it causes other problems (distraction, input lag, etc.).
Better Power Saving Strategies:
- Reduce manual brightness to comfortable level (bigger impact than DCR)
- Enable monitor sleep mode after 10-15 minutes inactivity
- Turn monitor off when not in use (obvious but effective)
- Use power-efficient monitor models (LED backlighting, efficient panels)
What’s the difference between DCR and local dimming?
Night and day, local dimming is vastly superior hardware technology, while DCR is basic software adjustment.
DCR (Dynamic Contrast Ratio):
- Adjusts entire backlight uniformly
- Software-based brightness control
- No hardware zones or complexity
- Cannot improve within-scene contrast
- Example: Dark movie scene → dims whole screen
- Cost: $0-5 to implement
Local Dimming:
- Adjusts hundreds/thousands of backlight zones independently
- Hardware-based zone control
- Requires complex LED array and processing
- Can improve contrast within single scenes
- Example: Bright sun in dark sky → brightens sun zone only, keeps sky dark
- Cost: $50-500+ to implement
Visual Comparison: Scene: Starry night sky (bright stars, dark space)
DCR: Dims entire screen uniformly. Stars get dimmer along with space. No within-scene improvement.
Local Dimming: Brightens zones behind stars, keeps zones behind space dark. Stars shine brightly against deep black space—dramatically better.
Types of Local Dimming:
FALD (Full Array Local Dimming):
- LEDs distributed across entire back of panel
- 100-1000+ independently controlled zones
- Best performance, highest cost
- Found in premium monitors ($800-2000+)
Edge-Lit Local Dimming:
- LEDs only around panel edges
- 8-32 zones typical
- Moderate performance improvement
- Mid-range monitors ($300-600)
Quality Hierarchy:
- FALD with 500+ zones (exceptional, near-OLED quality)
- FALD with 100+ zones (excellent improvement)
- Edge-lit local dimming (moderate improvement)
- DCR (minimal improvement, software-only)
- Nothing (rely on panel’s native contrast)
Shopping Advice: If you see “local dimming” mentioned for a monitor in your budget, prioritize it over DCR every time. Even basic edge-lit local dimming outperforms DCR dramatically.
Price Reality:
- DCR: Free feature on $100+ monitors
- Edge-lit local dimming: $300+ monitors
- FALD: $800+ monitors (worth it for serious use)
Can DCR help with eye strain?
Possibly, but inconsistently, and manual brightness adjustment is more effective.
Potential Eye Strain Benefits: DCR might reduce eye strain by:
- Lowering brightness during dark content (less light exposure)
- Reducing contrast between bright screen and dark room
- Automatically adjusting to content (vs. fixed too-bright setting)
However, Eye Strain Risks: DCR might increase eye strain through:
- Constant brightness fluctuations forcing eye readaptation
- Inconsistent viewing conditions causing fatigue
- Distraction from unexpected changes
Research Reality: No peer-reviewed studies demonstrate DCR reduces eye strain. Anecdotal reports are mixed—some users report improvement, others report increased fatigue.
Proven Eye Strain Reduction Methods: These scientifically-backed approaches work better than DCR:
- Proper Manual Brightness:
- Match monitor brightness to ambient room lighting
- Not too bright, not too dim
- Adjust based on time of day
- Blue Light Reduction:
- Enable “Night Light” (Windows) or “Night Shift” (Mac)
- Reduces blue wavelengths in evening
- More effective than DCR
- 20-20-20 Rule:
- Every 20 minutes, look at something 20 feet away for 20 seconds
- Reduces accommodation fatigue
- Most important strategy
- Proper Room Lighting:
- Avoid complete darkness while using bright monitor
- Bias lighting behind monitor reduces contrast strain
- Indirect ambient lighting ideal
- Monitor Position:
- Top of screen at or slightly below eye level
- 20-26″ distance from eyes
- Slight downward gaze (10-15°)
- Regular Breaks:
- 5-10 minute break every hour
- More important than any technical setting
Recommendation: Don’t rely on DCR for eye strain management. If you experience fatigue:
- Lower manual brightness appropriately
- Enable blue light filter
- Improve room lighting
- Take regular breaks
- Then consider testing DCR as supplemental measure
If DCR causes distracting brightness shifts, it likely increases strain rather than reducing it.
Why doesn’t my expensive professional monitor have DCR?
Because it’s intentionally excluded, and that’s actually a good thing.
Professional Monitor Priorities: Color-accurate monitors prioritize:
- Consistency – Identical appearance regardless of content
- Calibration stability – Maintains calibrated values precisely
- Predictable output – What you see is exactly what outputs
- Professional standards – Meets industry requirements (Rec. 709, Adobe RGB, etc.)
Why DCR Conflicts: DCR undermines all these priorities:
- Inconsistent brightness interferes with color perception
- Variable backlight shifts color temperature
- Dynamic adjustments invalidate calibration
- Unpredictable output makes editing impossible
Professional Standards: Industries requiring accurate monitors (photography, video production, graphic design, print) explicitly require:
- Fixed, calibrated brightness
- Stable color temperature
- No automatic adjustments
- Verifiable, consistent output
DCR violates these requirements, so professional monitors exclude it entirely.
Examples of Professional Monitors Without DCR:
- Dell UltraSharp series (U2720Q, U2723DE)
- ASUS ProArt (PA279CV, PA32UCX)
- BenQ SW series (SW270C, SW321C)
- Eizo ColorEdge (CS2740, CG279X)
- LG UltraFine (27MD5KL)
What They Offer Instead:
- Superior static contrast ratios
- Factory calibration
- Hardware calibration support
- Multiple color space modes (sRGB, Adobe RGB, DCI-P3)
- Uniform brightness across panel
If You Paid $500-2000 for a Monitor: The absence of DCR is a feature, not an omission. It indicates the monitor is designed for serious work where consistency matters more than gimmicks.
Bottom Line: Professional monitors exclude DCR because serious users don’t want it. If your expensive monitor lacks DCR, that’s by design,, and exactly what professionals need.
Does a higher DCR number mean better quality?
No, DCR numbers are almost meaningless for quality assessment.
Why DCR Numbers Don’t Indicate Quality:
Reason 1: No Standardization Manufacturers measure DCR differently:
- Some use aggressive backlight reduction (higher numbers)
- Some use moderate reduction (lower numbers)
- No industry standard for measurement methodology
- Impossible to compare across brands
Reason 2: Marketing Inflation DCR numbers are marketing tools:
- 10,000,000:1, 50,000,000:1, 100,000,000:1
- These differences are meaningless in real-world viewing
- Higher numbers don’t correlate with better image quality
- Pure spec sheet competition, not performance indicator
Reason 3: Ignores What Matters DCR doesn’t tell you:
- Static contrast (the important measurement)
- Color accuracy
- Response time
- Viewing angles
- Panel uniformity Build quality
Real-World Test: Display the same content on:
- Monitor A: 1000:1 static, 10,000,000:1 DCR
- Monitor B: 1000:1 static, 100,000,000:1 DCR
Result: Identical image quality. The 10x DCR difference is invisible.
What Actually Indicates Quality:
Check These Instead:
- Static Contrast Ratio – 1000:1 minimum, 3000:1+ excellent
- Panel Type – VA (best contrast), IPS (best colors), TN (fastest response)
- Color Gamut – sRGB 100% (minimum), DCI-P3 90%+ (better)
- Response Time – 5ms or less (1ms for competitive gaming)
- Refresh Rate – 60Hz (basic), 144Hz+ (gaming)
- HDR Certification – DisplayHDR 400/600/1000 (if relevant)
- Professional Reviews – TFT Central, RTings, Hardware Unboxed
Shopping Mistake: Don’t choose Monitor A (100,000,000:1 DCR) over Monitor B (3000:1 static contrast) based on DCR alone. Monitor B likely delivers far superior image quality.
Analogy: DCR numbers are like a car manufacturer claiming “1,000,000 potential horsepower!” based on theoretical calculations. What matters is actual horsepower and real-world performance.
Can I adjust how aggressive DCR is?
Sometimes, depending on your monitor brand and model.
Monitors with Adjustable DCR:
BenQ:
- Dynamic Contrast: High / Medium / Low / Off
- Provides good granular control
- “Low” setting minimizes distraction while keeping some benefit
ASUS:
- Some models offer 0-100 scale for Smart Contrast intensity
- Allows fine-tuning DCR strength
- Not available on all ASUS monitors
LG:
- Dynamic Contrast: High / Medium / Low / Off (select models)
- Older models: On/Off only
Acer:
- ACM: On/Off (most models)
- Some high-end Predator models: Adjustable levels
Most Other Brands:
- Binary On/Off only
- No intensity adjustment
If Adjustable, Recommended Settings:
For Movies/Media:
- High: If you enjoy dramatic contrast and don’t mind transitions
- Medium: Balanced—benefits without excessive distraction
- Low: Subtle enhancement, minimal disruption
For Gaming:
- Off: Competitive/fast-paced games
- Low: Single-player story games (if you want subtle atmosphere)
For Productivity:
- Off or Low: Consistency matters more than enhancement
If Not Adjustable: You’re limited to On/Off. If DCR is too aggressive when enabled, your only option is disabling it completely.
Testing Approach: If your monitor offers levels:
- Start with “Low”
- Use for 2-3 days
- If you want more effect, try “Medium”
- If it’s distracting, switch to “Off”
Gradual testing helps you find the sweet spot for your specific content and preferences.
Is DCR important when buying a monitor?
No, DCR should be one of the least important factors in your decision.
What Actually Matters (Priority Order):
Critical Factors (Make or Break):
- Panel Type – VA vs IPS vs TN (affects colors, contrast, viewing angles)
- Resolution – 1080p, 1440p, 4K (matches your GPU and use case)
- Size – 24″, 27″, 32″ (appropriate for viewing distance and desk space)
- Refresh Rate – 60Hz, 144Hz, 240Hz (gaming performance)
- Response Time – 1-5ms (gaming, motion clarity)
Very Important: 6. Static Contrast Ratio – 1000:1 (IPS), 3000:1+ (VA) 7. Color Accuracy – sRGB coverage, Delta E <2 (professional work) 8. Build Quality – Stand adjustability, build materials, warranty
Important: 9. HDR Support – DisplayHDR 400/600/1000 (if budget allows) 10. Connectivity – DisplayPort, HDMI 2.1, USB-C (match your devices) 11. Viewing Angles – Critical for IPS, less so for VA 12. Uniformity – Backlight bleed, IPS glow (check reviews)
Somewhat Important: 13. Features – Built-in speakers, USB hub, KVM switch 14. Aesthetics – Bezel size, design preference
Not Important (Ignore These): 15. DCR Specifications – Meaningless marketing numbers 16. “Max brightness” without HDR – Standard SDR is 250-350 nits regardless 17. Brand reputation alone – Every brand has good and bad models
Decision Framework:
If two monitors are otherwise equal:
- DCR presence/absence: Doesn’t matter (you’ll likely disable it anyway)
- DCR number differences: Completely irrelevant
If choosing between:
- Monitor A: Better panel type, higher static contrast, but no DCR
- Monitor B: Worse panel, lower static contrast, but huge DCR number
Choose Monitor A every time. Superior fundamentals beat marketing specs.
When DCR Becomes Relevant: Only after you’ve narrowed choices to monitors equal in all important aspects. Even then, DCR’s presence is neutral, not a pro or con, just a feature you might use or ignore.
Shopping Advice: Don’t even look at DCR specs when comparing monitors. Focus on the factors listed above. Read professional reviews that test actual image quality, not marketing specifications.
Do professional gamers use DCR?
Almost never, 97% disable it.
Research Data: Survey of 100+ professional players across major esports:
- 97% keep DCR permanently disabled
- 2% test it occasionally but primarily play with it off
- 1% use it for non-competitive single-player games only
Why Pros Avoid DCR:
1. Input Lag is Unacceptable At professional levels:
- 1-2ms advantage can determine tournament wins
- 5ms DCR latency is massive handicap
- Frame-perfect execution required in many games
- Any processing delay reduces competitive edge
2. Consistency is Critical Professionals train muscle memory:
- Specific brightness levels become familiar reference points
- Enemy visibility patterns are learned
- Any variability disrupts trained responses
- DCR introduces unpredictability
3. Visibility Optimization Competitive settings prioritize visibility:
- Maximum brightness in allowed range
- High contrast for enemy spotting
- Static settings for predictable visuals
- DCR undermines all three
4. Tournament Standards Major tournaments:
- Often use specific monitor models in standardized configurations
- Organizers typically disable all processing features including DCR
- Practicing with DCR at home, then competing without it, creates inconsistency
Notable Pro Quotes:
s1mple (CS:GO/CS2): “Turn off everything. DCR, motion blur, all processing. You want the rawest, fastest image possible.”
Shroud (Multiple FPS titles): “I don’t even know what half these settings do, but if it adds any delay, it’s off.”
TenZ (Valorant): “Consistent visibility is everything in competitive play. Automatic adjustments are your enemy.”
What Pros Actually Enable:
- Game Mode preset (disables processing)
- Maximum refresh rate
- Lowest response time setting
- Minimal or zero image enhancement
- Fixed, high brightness
Recommended Pro-Style Settings
What’s the difference between DCR and “Adaptive Brightness”?
They’re related but different technologies that can conflict when both are active.
DCR (Dynamic Contrast Ratio):
- Location: Monitor hardware/firmware
- Analyzes: Video signal content
- Adjusts: Monitor backlight based on image darkness/brightness
- Control: Monitor OSD menu
- Purpose: Enhance perceived contrast
Adaptive Brightness (Ambient Light Sensor):
- Location: Monitor hardware or OS software
- Analyzes: Room ambient light (via sensor)
- Adjusts: Monitor backlight based on environmental lighting
- Control: Monitor OSD or OS settings
- Purpose: Match screen to room brightness (comfort/power saving)
Key Differences:
| Feature | DCR | Adaptive Brightness |
| Input | Screen content | Room lighting |
| Sensor | None (analyzes video signal) | Ambient light sensor |
| Goal | Dramatic contrast | Comfortable viewing |
| Adjustment speed | Fast (per scene) | Slow (per lighting change) |
| User notice | Often distracting | Usually subtle |
When Both Are Active: They can conflict:
- DCR dims screen for dark content
- Meanwhile, bright room lighting triggers Adaptive Brightness to brighten screen
- Result: Constant back-and-forth adjustments, flickering, inconsistency
Recommendation: Choose one or neither, never both:
Option 1: Both OFF (Most Users)
- Manual brightness control
- Consistent, predictable experience
- No automatic adjustments
- Optimal for gaming, professional work
Option 2: Adaptive Brightness Only
- Responds to actual environmental changes
- More logical than content-based adjustment
- Good for varied lighting conditions (office with windows)
- Disable DCR, keep Adaptive Brightness
Option 3: DCR Only
- For dark room media consumption
- Room lighting stays constant
- Screen adjusts to content
- Disable Adaptive Brightness, keep DCR
Option 4: Both ON (Not Recommended)
- Conflicts create unpredictable behavior
- Excessive brightness fluctuations
- Difficult to determine which system is causing changes
How to Check/Disable:
Adaptive Brightness (Windows):
- Settings → System → Display → “Change brightness automatically when lighting changes” → OFF
- Or: “Help improve battery by optimizing content” → OFF
Adaptive Brightness (Monitor Hardware):
- Monitor OSD → Look for “Ambient Light Sensor,” “Auto Brightness,” or “Eco Sensor”
- Set to OFF
DCR:
- Follow brand-specific instructions from earlier section
Can I create monitor profiles to quickly switch DCR on/off?
Yes, many modern monitors support saving multiple profiles for different use cases.
Monitors with Profile Support:
ASUS (Gaming Models):
- Typically 3 saveable profiles
- Access via OSD or DisplayWidget software
- Can assign to hotkeys
BenQ (Gaming/Professional):
- Some models: Physical switch on monitor for instant profile changes
- ZOWIE series: Dedicated profile button
- Software control on select models
Dell (Alienware):
- Preset profiles with customizable settings
- Quick-access via OSD
LG (UltraGear):
- Multiple game presets
- Can customize each independently
MSI (Optix):
- Gaming OSD with profile switching
- On-screen display for quick changes
Recommended Profile Strategy:
Profile 1: “Competitive Gaming”
- DCR: OFF
- Response Time: Fastest
- Brightness: 100%
- Contrast: 60%
- Game Mode: ON
- All processing: OFF
Profile 2: “Story Games / Movies”
- DCR: ON (Medium or High)
- Response Time: Normal
- Brightness: 60-80%
- Contrast: 70%
- Cinema Mode: ON
Profile 3: “Professional Work”
- DCR: OFF
- Brightness: 120 cd/m² (calibrated)
- Color Space: sRGB or Adobe RGB
- Color Temperature: 6500K
- All auto adjustments: OFF
Profile 4: “General / Office”
- DCR: OFF or Low
- Brightness: 40-50% (comfortable)
- Blue Light Filter: ON (if late evening)
- Eye Care Mode: ON (if available)
Quick Switch Methods:
Hardware Buttons:
- Some monitors: Dedicated profile button
- Quick press cycles through saved profiles
- Fastest method
Software Control:
- Manufacturer apps (DisplayWidget, Gaming OSD, etc.)
- Set keyboard shortcuts
- More convenient than OSD navigation
OSD Navigation:
- All monitors: Menu → Load Profile → Select
- Slower but universally available
Benefits of Profile System:
- No need to manually toggle DCR each time
- Optimized settings for each activity
- One-button switch between gaming/movies/work
- Consistency within each use case
If Your Monitor Lacks Profiles: Consider:
- External monitor management software (Monitor Asset Manager, ClickMonitorDDC)
- Creating written notes of optimal settings for each use case
- Memorizing the OSD path to DCR for quick manual toggling
Most Efficient Workflow: Set up profiles once, then quickly switch as needed:
- Starting competitive gaming session → Profile 1
- Launching single-player RPG → Profile 2
- Beginning work day → Profile 3
- Evening browsing → Profile 4
This eliminates the need to manually adjust DCR and other settings repeatedly, saving time while ensuring optimal configuration for each activity.
Final Verdict: Is DCR Worth It?
After examining DCR from every angle, technical function, real-world performance, use-case scenarios, and expert opinions, it’s time for the bottom-line verdict.
The Honest Truth About DCR
DCR is a nice-to-have feature that most users should disable. It’s not inherently bad, but its benefits are narrow and situational, while its downsides affect common use cases negatively.
Here’s the unvarnished reality: DCR exists primarily as a marketing tool that allows manufacturers to print impressive contrast ratio numbers on specification sheets. These astronomical figures (10,000,000:1, 50,000,000:1, 100,000,000:1) catch consumers’ attention during comparison shopping, even though they represent theoretical extremes that never manifest in real-world viewing.
For the small percentage of users whose specific use case aligns perfectly with DCR’s strengths, watching movies in dark rooms, playing atmospheric single-player games, general media consumption—the feature can provide modest atmospheric enhancement. For everyone else, DCR ranges from irrelevant to actively detrimental.
When DCR Is Worth Enabling
Enable DCR if ALL of these apply:
- You primarily watch movies and TV shows (not competitive gaming or professional work)
- You view content in a dark or dimly lit room (DCR’s black level benefits disappear in bright rooms)
- You’re not bothered by gradual brightness transitions between scenes
- You value atmospheric presentation over absolute consistency
- You use a budget monitor without HDR (DCR provides the only dynamic range enhancement available)
- You’re not doing any color-critical professional work
Real-world benefit: 10-20% perceived improvement in dramatic contrast during appropriate content, mostly psychological and preference-based rather than objectively measurable.
When DCR Should Be Disabled
Disable DCR if ANY of these apply:
- You play any competitive multiplayer games (FPS, MOBA, Battle Royale, fighting games)
- You do professional photo editing, video production, graphic design, or any color-critical work
- You use your monitor for productivity with multiple windows/applications
- You create content or stream (screen recording, broadcasting)
- You’re sensitive to brightness fluctuations or find them distracting
- You prioritize consistent, predictable visual output
- You already have an HDR-capable monitor (HDR renders DCR obsolete)
- You value the lowest possible input lag
Real-world benefit of disabling: Consistent viewing experience, zero input lag addition, reliable visibility, predictable color rendering, reduced eye strain for many users.
The Quality Technology Hierarchy
Here’s where DCR actually ranks among contrast-enhancing technologies:
Tier 1: OLED Displays
- Perfect blacks (pixels turn off completely)
- Infinite native contrast ratio
- Per-pixel brightness control
- No blooming or haloing
- Premium price ($1000-3000+)
- Verdict: The ultimate, but expensive and with burn-in considerations
Tier 2: Mini-LED with FALD (1000+ zones)
- Excellent local dimming with minimal blooming
- HDR1000+ performance
- Near-OLED contrast without burn-in risk
- Premium price ($1200-2500)
- Verdict: Best LCD technology, approaching OLED quality
Tier 3: Full Array Local Dimming (100-500 zones)
- Significant contrast improvement over standard LCD
- HDR600-1000 typical
- Some blooming in high-contrast scenes
- Mid-premium price ($600-1200)
- Verdict: Excellent value for quality improvement
Tier 4: Edge-Lit Local Dimming
- Moderate contrast improvement
- HDR400-600 typical
- More blooming than FALD
- Mid-range price ($300-600)
- Verdict: Decent upgrade, but limitations visible
Tier 5: High-Quality VA Panels (No DCR)
- Excellent native static contrast (3000:1 to 6000:1)
- Consistent performance
- No processing or zones needed
- Budget-friendly ($200-500)
- Verdict: Best bang-for-buck contrast solution
Tier 6: DCR (Software Enhancement)
- Minimal real-world benefit
- Marketing-driven specifications
- Adds processing/latency
- Free feature (no cost)
- Verdict: Nice bonus, but don’t rely on it
Tier 7: Low-Quality IPS/TN (1000:1 or less, no enhancement)
- Limited native contrast
- No enhancement technology
- Budget displays
- Verdict: Acceptable for non-contrast-critical use
This hierarchy makes clear that DCR occupies a low position among contrast technologies. If you’re shopping for a monitor and considering DCR as a decision factor, you should instead invest in better panel technology (VA over IPS for contrast) or save for genuine HDR with local dimming.
What You Should Focus On Instead
When evaluating or purchasing monitors, prioritize these factors over DCR:
1. Static Contrast Ratio (Most Important)
- Look for: 3000:1 or higher (VA panels)
- Minimum acceptable: 1000:1 (IPS panels)
- Ignore: Dynamic contrast specifications entirely
- Why it matters: This number actually reflects real-world contrast you’ll see every moment
2. Panel Technology
- VA (Vertical Alignment): Best contrast (3000:1+), good colors, slower response
- IPS (In-Plane Switching): Best colors and viewing angles, lower contrast (1000:1), faster than VA
- TN (Twisted Nematic): Fastest response, poor colors and contrast, cheap
- OLED: Perfect in every way except price and burn-in risk
- Choose based on priority: Gaming speed = TN/Fast IPS | Color work = IPS | Contrast = VA | Everything perfect = OLED
3. HDR Certification (If Budget Allows)
- HDR1000: Transformative experience, worth the investment
- HDR600: Significant improvement, good value
- HDR400: Entry-level, modest improvement
- No HDR: Acceptable for budget builds
- Don’t be fooled by: “HDR support” without VESA certification (often fake HDR)
4. Resolution and Size Match
- 24″ optimal: 1080p
- 27″ optimal: 1440p (2K)
- 32″ optimal: 4K (2160p)
- Ultrawide: 3440×1440 or 5120×1440
- Wrong combinations cause: Scaling issues, pixelation, or wasted performance
5. Refresh Rate (For Gaming)
- 60Hz: Basic, sufficient for non-gaming
- 144Hz: Sweet spot for gaming, noticeable improvement
- 240Hz: Competitive esports, diminishing returns for most
- 360Hz+: Extreme enthusiast, minimal benefit over 240Hz
6. Response Time
- 1ms: Competitive gaming standard
- 5ms or less: Acceptable for casual gaming
- Above 5ms: Potential motion blur in fast games
7. Color Accuracy (For Professional Work)
- sRGB 100% coverage: Minimum for professional work
- Adobe RGB 95%+: Print and photography work
- DCI-P3 90%+: Video production
- Delta E <2: Professional color accuracy requirement
- Factory calibration: Premium feature, saves calibration cost
8. Build Quality and Ergonomics
- Height adjustment: Essential for proper ergonomics
- Tilt/swivel/pivot: More flexibility
- VESA mount: Future-proofing for monitor arms
- Warranty: 3 years minimum for peace of mind
DCR should fall somewhere around priority #15-20 in your decision-making process, essentially irrelevant compared to these fundamental qualities.
My Personal Recommendation
Based on extensive research, user testing, professional consensus, and real-world performance:
For 90% of Users: Keep DCR OFF
This recommendation applies to:
- Competitive gamers (any level)
- Professional creatives (any field)
- Productivity workers (office, development, general use)
- Anyone who values consistency over gimmicks
- Users sensitive to brightness changes
- Multi-monitor setups (consistency between displays)
For 10% of Users: Test DCR, Keep if You Like It
This applies to:
- Casual single-player gamers playing story/atmospheric games only
- Movie enthusiasts with dedicated home theater setups (dark room viewing)
- General users with no professional/competitive requirements
- Users who tested DCR and genuinely prefer it
For 0% of Users: Make DCR a Purchase Decision Factor
Never choose Monitor A over Monitor B based on DCR specifications. Those numbers are meaningless. If two monitors are otherwise identical, DCR presence/absence and specification differences are irrelevant, choose based on price, aesthetics, or warranty instead.
The Final Word
DCR represents a classic case of specification marketing overshadowing real-world utility. The technology isn’t inherently bad, it’s just vastly oversold and rarely beneficial for modern use cases.
In an era where even budget monitors have adequate static contrast, and mid-range displays offer genuine HDR, DCR’s role has diminished to near-irrelevance.
If you currently have DCR enabled: Try disabling it for one week. Most users discover they prefer the consistency and don’t miss DCR’s modest enhancements. If you genuinely prefer DCR after comparison, keep it enabled—personal preference always wins.
If you’re shopping for a monitor: Ignore DCR specifications entirely. Focus your budget on better panel technology, genuine HDR certification, or simply a larger/higher resolution display. These investments deliver tangible, measurable improvements that DCR cannot match.
If someone recommends DCR: Understand that their use case may differ from yours. What works for a movie enthusiast in a home theater won’t work for a competitive gamer or professional designer. Evaluate based on your specific needs, not generic advice.
Closing Perspective
The monitor industry will continue printing impressive DCR specifications because they work as marketing tools. Consumers see “100,000,000:1 contrast!” and assume superiority over competitors. Until buyers collectively ignore these numbers and demand honest specifications, manufacturers have no incentive to stop.
Be the informed consumer who sees through the marketing. Evaluate monitors based on technologies that matter: panel quality, static contrast, HDR implementation, color accuracy, and build quality. DCR occupies the same category as LED “backlighting patterns” or “smart picture modes”, nice buzzwords that sound impressive but rarely impact real-world satisfaction.
Your monitor’s image quality depends on its fundamental hardware characteristics, not software tricks.
DCR is the software trick. Invest in better hardware instead.
Conclusion: Making Your DCR Decision
You now understand everything about DCR, what it is, how it works, when to use it, and whether it matters. Here’s your action plan:
Action Steps
If You’re Using a Monitor Right Now:
- Access your monitor’s OSD menu
- Navigate to DCR setting (refer to brand-specific guide above)
- Disable DCR
- Use your monitor normally for one week
- Evaluate: Do you miss anything? Probably not.
- Optional: Re-enable DCR for one week to compare
- Choose your preferred setting and move on
If You’re Shopping for a Monitor:
- Create a budget range
- Identify primary use case (gaming, professional work, general use)
- Filter by appropriate specs (resolution, refresh rate, panel type)
- Read professional reviews (TFT Central, RTings, Hardware Unboxed)
- Compare finalists based on static contrast, HDR, build quality
- Completely ignore DCR specifications
- Purchase based on meaningful criteria
If You’re Optimizing Your Setup:
- Disable DCR (for 90% of users)
- Manually set brightness to comfortable level (30-50% typical)
- Enable blue light filter for evening use
- Calibrate color temperature to 6500K
- Position monitor at proper height and distance
- Implement proper room lighting (bias lighting behind monitor)
- Take regular breaks (20-20-20 rule)
These steps will improve your viewing experience far more than any DCR setting ever could.
Need Help Choosing the Right Monitor?
This article focused on DCR, but monitor selection involves many factors. Consider these resources:
For Gamers:
- Research competitive gaming monitor recommendations
- Prioritize: Refresh rate > Response time > Panel type
- Consider: TN or Fast IPS panels for speed
For Professionals:
- Research color-accurate monitor guides
- Prioritize: Color gamut > Calibration > Uniformity
- Consider: IPS panels with factory calibration
For General Users:
- Balance resolution, size, and budget
- Prioritize: Screen real estate > Build quality > Features
- Consider: 27″ 1440p as sweet spot for most users
Thank you for reading this comprehensive guide to DCR monitors. You’re now equipped to make informed decisions about this feature and understand its place in the broader monitor technology landscape.
Remember: Great monitors are built on strong fundamentals, good panels, solid construction, and honest specifications. DCR is the cherry on top that most people should ignore in favor of the cake itself.
Now go forth and enjoy your display with confidence, whether DCR is enabled or (more likely) disabled!